Week 3 [Fri, Aug 20th] - Topics
Similar to last week, most topics for this week are TIC2002 topics given here for reference. But there are some new topics too (they are marked by one of these icons: , , , : OPTIONAL)
Detailed Table of Contents
Can explain class-level members
While all objects of a class have the same attributes, each object has its own copy of the attribute value.
All Person objects have the name attribute but the value of that attribute varies between Person objects.
However, some attributes are not suitable to be maintained by individual objects. Instead, they should be maintained centrally, shared by all objects of the class. They are like ‘global variables’ but attached to a specific class. Such variables whose value is shared by all instances of a class are called class-level attributes.
The attribute totalPersons should be maintained centrally and shared by all Person objects rather than copied at each Person object.
Similarly, when a normal method is being called, a message is being sent to the receiving object and the result may depend on the receiving object.
Sending the getName() message to the Adam object results in the response "Adam" while sending the same message to the Beth object results in the response "Beth".
However, there can be methods related to a specific class but not suitable for sending messages to a specific object of that class. Such methods that are called using the class instead of a specific instance are called class-level methods.
The method getTotalPersons() is not suitable to send to a specific Person object because a specific object of the Person class should not have to know about the total number of Person objects.
Class-level attributes and methods are collectively called class-level members (also called static members sometimes because some programming languages use the keyword static to identify class-level members). They are to be accessed using the class name rather than an instance of the class.
Exercises
Can use class-level members
The content below is an extract from -- Java Tutorial, with slight adaptations.
When a number of objects are created from the same class blueprint, they each have their own distinct copies of instance variables. In the case of a Bicycle class, the instance variables are gear, and speed. Each Bicycle object has its own values for these variables, stored in different memory locations.
Sometimes, you want to have variables that are common to all objects. This is accomplished with the static modifier. Fields that have the static modifier in their declaration are called static fields or class variables. They are associated with the class, rather than with any object. Every instance of the class shares a class variable, which is in one fixed location in memory. Any object can change the value of a class variable, but class variables can also be manipulated without creating an instance of the class.
Suppose you want to create a number of Bicycle objects and assign each a serial number, beginning with 1 for the first object. This ID number is unique to each object and is therefore an instance variable. At the same time, you need a field to keep track of how many Bicycle objects have been created so that you know what ID to assign to the next one. Such a field is not related to any individual object, but to the class as a whole. For this you need a class variable, numberOfBicycles, as follows:
public class Bicycle {

    private int gear;
    private int speed;

    // an instance variable for the object ID
    private int id;

    // a class variable for the number of Bicycle
    //   objects instantiated
    private static int numberOfBicycles = 0;
        ...
}
Class variables are referenced by the class name itself, as in Bicycle.numberOfBicycles This makes it clear that they are class variables.
The Java programming language supports static methods as well as static variables. Static methods, which have the static modifier in their declarations, should be invoked with the class name, without the need for creating an instance of the class, as in ClassName.methodName(args)
The static modifier, in combination with the final modifier, is also used to define constants. The final modifier indicates that the value of this field cannot change. For example, the following variable declaration defines a constant named PI, whose value is an approximation of pi (the ratio of the circumference of a circle to its diameter):
static final double PI = 3.141592653589793;
Here is an example with class-level variables and class-level methods:
public class Bicycle {

    private int gear;
    private int speed;

    private int id;

    private static int numberOfBicycles = 0;


    public Bicycle(int startSpeed, int startGear) {
        gear = startGear;
        speed = startSpeed;

        numberOfBicycles++;
        id = numberOfBicycles;
    }

    public int getID() {
        return id;
    }

    public static int getNumberOfBicycles() {
        return numberOfBicycles;
    }

    public int getGear(){
        return gear;
    }

    public void setGear(int newValue) {
        gear = newValue;
    }

    public int getSpeed() {
        return speed;
    }

    // ...

}
Explanation of System.out.println(...):
outis a class-level public attribute of theSystemclass.printlnis an instance level method of theoutobject.
Consider the Circle class below:
public class Circle {
    private int x;
    private int y;
    private double radius;

    public Circle(){
        this(0, 0, 0);
    }

    public Circle(int x, int y, double radius){
        setX(x);
        setY(y);
        setRadius(radius);
    }

    public int getX() {
        return x;
    }

    public void setX(int x) {
        this.x = x;
    }

    public int getY() {
        return y;
    }

    public void setY(int y) {
        this.y = y;
    }

    public double getRadius() {
        return radius;
    }

    public void setRadius(double radius) {
        this.radius = Math.max(radius, 0);
    }

    public int getArea(){
        double area = Math.PI * Math.pow(radius, 2);
        return (int)area;
    }
}
Update it as follows so that code given below produces the given output.
- Add a class-level
getMaxRadiusmethod that returns the maximum radius that has been used in allCircleobjects created thus far.
public class Main {
    public static void main(String[] args) {
        Circle c = new Circle();
        System.out.println("max radius used so far : " + Circle.getMaxRadius());
        c = new Circle(0, 0, 10);
        System.out.println("max radius used so far : " + Circle.getMaxRadius());
        c = new Circle(0, 0, -15);
        System.out.println("max radius used so far : " + Circle.getMaxRadius());
        c.setRadius(12);
        System.out.println("max radius used so far : " + Circle.getMaxRadius());
    }
}
max radius used so far : 0.0
max radius used so far : 10.0
max radius used so far : 10.0
max radius used so far : 12.0
Hint
Can explain APIs
An Application Programming Interface (API) specifies the interface through which other programs can interact with a software component. It is a contract between the component and its clients.
A class has an API (e.g., API of the Java String class, API of the Python str class) which is a collection of public methods that you can invoke to make use of the class.
The GitHub API is a collection of web request formats that the GitHub server accepts and their corresponding responses. You can write a program that interacts with GitHub through that API.
When developing large systems, if you define the API of each component early, the development team can develop the components in parallel because the future behavior of the other components are now more predictable.
Exercises
Can use Java API documentation about classes
Java comes with a rich collection of classes that you can use. They form what is known as the Java API (Application Programming Interface). Each class in the API comes with documentation in a standard format.
Can use the String class
String is a built-in Java class that you can use without importing. Given below are some useful String methods:
Find characters of a string
Strings provide a method named charAt, which extracts a character. It returns a char, a primitive type that stores an individual character (as opposed to strings of them).
String fruit = "banana";
char letter = fruit.charAt(0);
The argument 0 means that we want the letter at position 0. Like array indexes, string indexes start at 0, so the character assigned to letter is 'b'.
You can convert a string to an array of characters using the toCharArray method.
char[] fruitChars = fruit.toCharArray()
Change a string to upper/lower case
Strings provide methods, toUpperCase and toLowerCase, that convert from uppercase to lowercase and back.
After these statements run, upperName refers to the string "ALAN TURING" but name still refers to "Alan Turing".
String name = "Alan Turing";
String upperName = name.toUpperCase();
System.out.println(name);
System.out.println(upperName);
Alan Turing
ALAN TURING
Note that a string method cannot change the string object on which the method is invoked, because strings are once created, cannot be modifiedimmutable. For example, when you invoke toUpperCase on a string "abc", you get a new string object "ABC" as the return value rather than the string "abc" being changed to "ABC". As a result, for such string methods that seemingly modify the string but actually return a new string instead e.g., toLowerCase, invoking the method has no effect if you don’t assign the return value to a variable.
String s = "Ada";
s.toUpperCase(); // no effect
s = s.toUpperCase(); // the correct way
Replacing parts of a string
Another useful method is replace, which finds and replaces instances of one string within another.
This example replaces "Computer Science" with "CS".
String text = "Computer Science is fun!";
text = text.replace("Computer Science", "CS");
System.out.println(text);
CS is fun!
Accessing substrings
The substring method returns a new string that copies letters from an existing string, starting at the given index.
"banana".substring(0)"banana""banana".substring(2)"nana""banana".substring(6)""
If it’s invoked with two arguments, they are treated as a start and end index:
"banana".substring(0, 3)"ban""banana".substring(2, 5)"nan""banana".substring(6, 6)""
Searching within strings
The indexOf method searches for a single character (or a substring) in a string and returns the index of the first occurrence. The method returns -1 if there are no occurrences.
"banana".indexOf('a')1"banana".indexOf('a', 2)3searches for'a', starting from position 2"banana".indexOf('x')-1"banana".indexOf("nan")2searches for the substring"nan"
Comparing strings
To compare two strings, it is tempting to use the == and != operators.
String name1 = "Alan Turing";
String name2 = "Alan Turing";
System.out.println(name1 == name2);
This code compiles and runs, and most of the time it shows true. But it is not correct. The problem is, i.e., as opposed to comparing primitive values e.g., 2 == 2when used for comparing objects, the == operator checks whether the two variables refer to the same object (by comparing the references). If you give it two different string objects that contain the same letters, it is supposed to yield false because they are two distinct objects even if they contain the same text. However, because Java strings are immutable, in some cases (but not always) Java reuses existing string objects instead of creating multiple objects, which can cause the above code to yield true. Therefore, it is not safe to use == to compare strings if your intention is to check if they contain the same text.
The right way to compare strings is with the equals method.
This example invokes equals on name1 and passes name2 as an argument. The equals method returns true if the strings contain the same characters; otherwise it returns false.
if (name1.equals(name2)) {
    System.out.println("The names are the same.");
}
If the strings differ, you can use compareTo to see which comes first in alphabetical order. The return value from compareTo is the difference between the first characters in the strings that differ. If the strings are equal, their difference is zero. If the first string (the one on which the method is invoked) comes first in the alphabet, the difference is negative. Otherwise, the difference is positive.
In this example, compareTo returns positive 8, because the second letter of "Alan" comes 8 letters after the second letter of "Ada".
String name1 = "Alan";
String name2 = "Ada";
int diff = name1.compareTo(name2);
if (diff == 0) {
    System.out.println("The names are the same.");
} else if (diff < 0) {
    System.out.println("name1 comes before name2.");
} else if (diff > 0) {
    System.out.println("name2 comes before name1.");
}
Both equals and compareTo are case-sensitive. The uppercase letters come before the lowercase letters, so "Ada" comes before "ada". To check if two strings are similar irrespective of the differences in case, you can use the equalsIgnoreCase method.
String s1 = "Apple";
String s2 = "apple";
System.out.println(s1.equals(s2)); //false
System.out.println(s1.equalsIgnoreCase(s2)); //true
Some more comparison-related String methods:
contains: checks if one string is a sub-string of the other e.g.,SnappleandappstartsWith: checks if one string has the other as a substring at the beginning e.g.,AppleandAppendsWith: checks if one string has the other as a substring at the end e.g.,Crabandab
Printing special characters (line breaks, tabs, ...)
You can embed a special character e.g., line break, tab, backspace, etc. in a string using an escape sequence.
| Escape sequence | meaning |
|---|---|
\n | newline character |
\t | tab character |
\b | backspace character |
\f | form feed character |
\r | carriage return character |
\" | " (double quote) character |
\' | ' (single quote) character |
\\ | \ (back slash) character |
\uDDDD | character from the Unicode character set, by specifying the Unicode as four hex digits in the place of DDDD |
An example of using escape sequences to print some special characters.
System.out.println("First line\nSecond \"line\"");
First line
Second "line"
As the behavior of the \n e.g., behavior differs between Windows and OS-Xdepends on the platform, the recommended way to print a line break is using the System.lineSeparator() as it works the same in all platforms.
Using System.lineSeparator() to print a line break.
System.out.println("First" + System.lineSeparator() + "Second");
First
Second
String formatting
Sometimes programs need to create strings that are formatted in a certain way. String.format takes a format specifier followed by a sequence of values and returns a new string formatted as specified.
The following method returns a time string in 12-hour format. The format specifier \%02d means “two digit integer padded with zeros”, so timeString(19, 5) returns the string "07:05 PM".
public static String timeString(int hour, int minute) {
    String ampm;
    if (hour < 12) {
        ampm = "AM";
        if (hour == 0) {
            hour = 12;  // midnight
        }
    } else {
        ampm = "PM";
        hour = hour - 12;
    }

    // returns "07:05 PM"
    return String.format("%02d:%02d %s", hour, minute, ampm);
}
Implement the printPrice method in the code below to produce the given output. Its behavior:
- The parameter
itemis a string in the formatname--$pricei.e., a name and a price of an item separated using a--e.g.,banana--$3/50 - It prints the
NAME: pricewhere the name is in upper case. The price does not have a$sign and has.in place of the/
e.g.,banana--$3/50BANANA: 3.50 - The
namepart of the input can have trailing/leading spaces which should be omitted from the output.
e.g.,banana --$3/50BANANA: 3.50
Do a Web search to find how to remove leading/trailing spaces. Suggested search terms java string remove leading trailing spaces
public class Main {

    public static void printPrice(String item) {
        // TODO: add your code here

    }

    public static void main(String[] args) {
        printPrice("sandwich  --$4/50");
        printPrice("  soda --$10/00");
        printPrice("  fries --$0/50");
    }
}
SANDWICH: 4.50
SODA: 10.00
FRIES: 0.50
Hint
Can use wrapper classes for primitive
Primitive values (like int, double, and char) do not provide methods.
For example, you can’t call equals on an int:
int i = 5;
System.out.println(i.equals(5));  // compiler error
But for each primitive type, there is a corresponding class in the Java library, called a wrapper class, as given in the table below. They are in the java.lang package i.e., no need to import.
| Primitive type | Wrapper class |
|---|---|
byte | Byte |
short | Short |
int | Integer |
long | Long |
float | Float |
double | Double |
char | Character |
boolean | Boolean |
Double d = new Double(2.5);
int i = d.intValue();
System.out.println(d);
System.out.println(i);
2.5
2
Each wrapper class defines constants MIN_VALUE and MAX_VALUE.
Accessing max and min values for integers:
System.out.println(Integer.MIN_VALUE + " : " + Integer.MAX_VALUE);
-2147483648 : 2147483647
Wrapper classes provide methods for In this context, parse means something like “read and translate”parsing strings to other types e.g., Integer.parseInt converts a string to (you guessed it) an integer. The other wrapper classes provide similar methods, like Double.parseDouble and Boolean.parseBoolean.
Integer.parseInt("1234") 1234
Wrapper classes also provide toString, which returns a string representation of a value.
Integer.toString(1234) "1234"
Implement the printTotalScore method in the code below to produce the given output. Its behavior:
valuesis an array of strings, each string representing an integer e.g.,["5", "-1"]- The method prints the total of the numbers represented by the strings in the array
["5", "-1"]4
public class Main {

    public static void printTotalScore(String[] values){
        // TODO: add your code here
    }

    public static void main(String[] args) {
        printTotalScore(new String[]{});
        printTotalScore(new String[]{"0", "124", "-15"});
    }
}
0
109
Can use the Arrays class
java.util.Arrays provides methods for working with arrays. One of them, toString, returns a string representation of an array. It also provides a copyOf that copies an array.
Using Arrays.copyOf and Arrays.toString:
int[] a = new int[]{1,2,3,4};

int[] b = Arrays.copyOf(a, 3); // copy first three elements
System.out.println(Arrays.toString(b));

int[] c = Arrays.copyOf(a, a.length); // copy all elements
System.out.println(Arrays.toString(c));
[1, 2, 3]
[1, 2, 3, 4]
Implement the following two methods in the code below to produce the given output.
filterEmails(String[] items): String[]itemsis an array of strings each of which may be an email address or some other random string- Returns a
String[]containing email addresses that were initems. Any string containing@is considered as an email.
["aaa@bbb", "xyz"]["aaa@bbb"]
printItems(String[] items)- Prints
itemsin the standard array format. e.g.,["aaa", "bbb"][aaa, bbb]
- Prints
import java.util.Arrays;

public class Main {
    public static String[] filterEmails(String[] items){
        // TODO: add your code here
    }

    public static void printItems(String[] items){
        // TODO: add your code here
    }

    public static void main(String[] args) {
        printItems(filterEmails(new String[]{}));
        printItems(filterEmails(new String[]{"abc"}));
        printItems(filterEmails(new String[]{"adam@example.com", "aab", "john@example.com", "some@"}));
        printItems(filterEmails(new String[]{"xyz", "@bee.com", "aab"}));
    }
}
[]
[]
[adam@example.com, john@example.com, some@]
[@bee.com]
Hint
Can use the Scanner class
Scanner is a class that provides methods for inputting words, numbers, and other data. Scanner provides a method called nextLine that reads a line of input from the keyboard and returns a String. The following example reads two lines and repeats them back to the user:
import java.util.Scanner;

public class Echo {

    public static void main(String[] args) {
        String line;
        Scanner in = new Scanner(System.in);

        System.out.print("Type something: ");
        line = in.nextLine();
        System.out.println("You said: " + line);

        System.out.print("Type something else: ");
        line = in.nextLine();
        System.out.println("You also said: " + line);
    }
}
Scanner class normally reads inputs as strings but it can read in a specific type of input too.
The code below uses the nextInt method of the Scanner class to read an input as an integer.
Scanner in = new Scanner(System.in);

System.out.print("What is your age? ");
int age = in.nextInt();
in.nextLine();  // read the new-line character that follows the integer
System.out.print("What is your name? ");
String name = in.nextLine();
System.out.printf("Hello %s, age %d\n", name, age);
Write a program to ask the user for a description of overseas expenses (presumably, the user has just returned from an overseas trip) and calculate the total in local currency.
- The conversion rate from overseas currency to local currency : overseas
$1.0= local$1.70 - The user can describe expenses is in free form text, as one line. The program takes all amounts mentioned in the format
$amounte.g.,$1.50
Here is one example output:
Your expenses while overseas?beer $4.50 books $3.00 $5.00 for food, that's all
Expenses in overseas currency:[$4.50, $3.00, $5.00]
Total in local currency: $21.25
Here is another:
Your expenses while overseas?nothing. I lived off my friends all the time.
Expenses in overseas currency:[]
Total in local currency: $0.00
One more:
Your expenses while overseas? Just $10
Expenses in overseas currency:[$10]
Total in local currency: $17.00
Here's the skeleton code to use as the starting point:
public class Main {

    // You can add more methods here

    public static void main(String[] args) {
        String line;
        Scanner in = new Scanner(System.in);

        System.out.print("Your expenses while overseas?");
       // TODO: add your code here
    }
}
You can use the split method of the String class to convert a sentence into an array of words. e.g.,
String sentence = "hello my dear";

// split using the space as the delimiter
String[] words = sentence.split(" ");

System.out.println(Arrays.toString(words));
[hello, my, dear]
Hint
Can explain the meaning of inheritance
The OOP concept Inheritance allows you to define a new class based on an existing class.
For example, you can use inheritance to define an EvaluationReport class based on an existing Report class so that the EvaluationReport class does not have to duplicate data/behaviors that are already implemented in the Report class. The EvaluationReport can inherit the wordCount attribute and the print() method from the base class Report.
- Other names for Base class: Parent class, Superclass
- Other names for Derived class: Child class, Subclass, Extended class
A superclass is said to be more general than the subclass. Conversely, a subclass is said to be more specialized than the superclass.
Applying inheritance on a group of similar classes can result in the common parts among classes being extracted into more general classes.
Man and Woman behave the same way for certain things. However, the two classes cannot be simply replaced with a more general class Person because of the need to distinguish between Man and Woman for certain other things. A solution is to add the Person class as a superclass (to contain the code common to men and women) and let Man and Woman inherit from Person class.
Inheritance implies the derived class can be considered as a sub-type of the base class (and the base class is a super-type of the derived class), resulting in an is a relationship.
Inheritance does not necessarily mean a sub-type relationship exists. However, the two often go hand-in-hand. For simplicity, at this point let us assume inheritance implies a sub-type relationship.
To continue the previous example,
Womanis aPersonManis aPerson
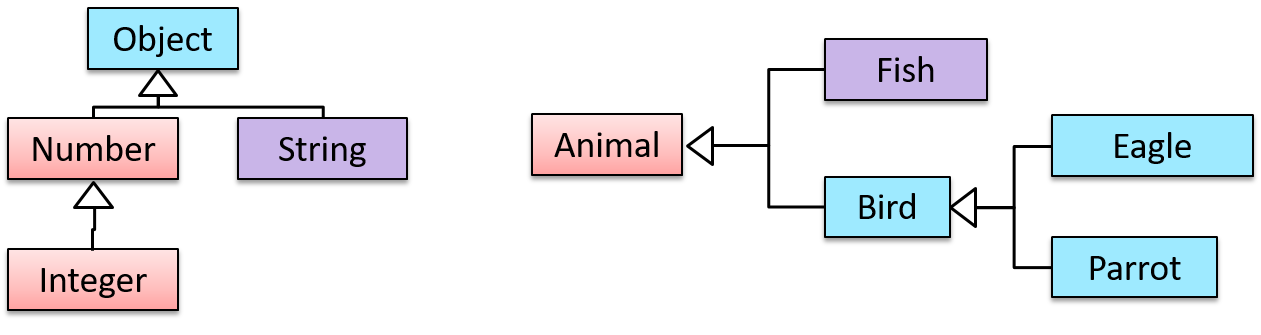
Inheritance relationships through a chain of classes can result in inheritance hierarchies (aka inheritance trees).
Two inheritance hierarchies/trees are given below. Note that the triangle points to the parent class. Observe how the Parrot is a Bird as well as it is an Animal.
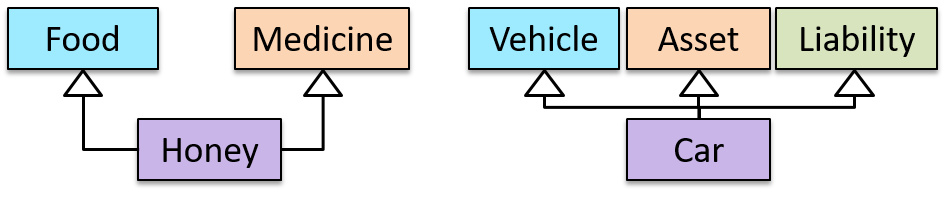
Multiple Inheritance is when a class inherits directly from multiple classes. Multiple inheritance among classes is allowed in some languages (e.g., Python, C++) but not in other languages (e.g., Java, C#).
The Honey class inherits from the Food class and the Medicine class because honey can be consumed as a food as well as a medicine (in some oriental medicine practices). Similarly, a Car is a Vehicle, an Asset and a Liability.
Exercises
Can explain method overloading
Method overloading is when there are multiple methods with the same name but different type signatures. Overloading is used to indicate that multiple operations do similar things but take different parameters.
Type signature: The type signature of an operation is the type sequence of the parameters. The return type and parameter names are not part of the type signature. However, the parameter order is significant.
Example:
| Method | Type Signature |
|---|---|
int add(int X, int Y) | (int, int) |
void add(int A, int B) | (int, int) |
void m(int X, double Y) | (int, double) |
void m(double X, int Y) | (double, int) |
In the case below, the calculate method is overloaded because the two methods have the same name but different type signatures (String) and (int).
calculate(String): voidcalculate(int): void
OOP → Inheritance → What
Can explain method overriding
Method overriding is when a sub-class changes the behavior inherited from the parent class by re-implementing the method. Overridden methods have the same name, same type signature, and same return type.
Consider the following case of EvaluationReport class inheriting the Report class:
Report methods | EvaluationReport methods | Overrides? |
|---|---|---|
print() | print() | Yes |
write(String) | write(String) | Yes |
read():String | read(int):String | No. Reason: the two methods have different signatures; This is a case of overloading (rather than overriding). |
Exercises
Can use basic inheritance
Given below is an extract from the -- Java Tutorial, with slight adaptations.
A class that is derived from another class is called a subclass (also a derived class, extended class, or child class). The class from which the subclass is derived is called a superclass (also a base class or a parent class).
A subclass inherits all the members (fields, methods, and nested classes) from its superclass. Constructors are not members, so they are not inherited by subclasses, but the constructor of the superclass can be invoked from the subclass.
Every class has one and only one direct superclass (single inheritance), except the Object class, which has no superclass, . In the absence of any other explicit superclass, every class is implicitly a subclass of Object. Classes can be derived from classes that are derived from classes that are derived from classes, and so on, and ultimately derived from the topmost class, Object. Such a class is said to be descended from all the classes in the inheritance chain stretching back to Object. Java does not support multiple inheritance among classes.
The java.lang.Object class defines and implements behavior common to all classes—including the ones that you write. In the Java platform, many classes derive directly from Object, other classes derive from some of those classes, and so on, forming a single hierarchy of classes.
The keyword extends indicates one class inheriting from another.
Here is the sample code for a possible implementation of a Bicycle class and a MountainBike class that is a subclass of the Bicycle:
public class Bicycle {

    public int gear;
    public int speed;

    public Bicycle(int startSpeed, int startGear) {
        gear = startGear;
        speed = startSpeed;
    }

    public void setGear(int newValue) {
        gear = newValue;
    }

    public void applyBrake(int decrement) {
        speed -= decrement;
    }

    public void speedUp(int increment) {
        speed += increment;
    }

}
public class MountainBike extends Bicycle {

    // the MountainBike subclass adds one field
    public int seatHeight;

    // the MountainBike subclass has one constructor
    public MountainBike(int startHeight, int startSpeed, int startGear) {
        super(startSpeed, startGear);
        seatHeight = startHeight;
    }

    // the MountainBike subclass adds one method
    public void setHeight(int newValue) {
        seatHeight = newValue;
    }
}
A subclass inherits all the fields and methods of the superclass. In the example above, MountainBike inherits all the fields and methods of Bicycle and adds the field seatHeight and a method to set it.
Accessing superclass members
If your method overrides one of its superclass's methods, you can invoke the overridden method through the use of the keyword super. You can also use super to refer to a when both the superclass and the subclass use the same variable name, the superclass variables is said to be hidden/shadowed by the subclass variablehidden field (although hiding fields is discouraged).
Consider this class, Superclass and a subclass, called Subclass, that overrides printMethod():
public class Superclass {

    public void printMethod() {
        System.out.println("Printed in Superclass.");
    }
}
public class Subclass extends Superclass {

    // overrides printMethod in Superclass
    public void printMethod() {
        super.printMethod();
        System.out.println("Printed in Subclass");
    }
    public static void main(String[] args) {
        Subclass s = new Subclass();
        s.printMethod();
    }
}
Printed in Superclass.
Printed in Subclass
Within Subclass, the simple name printMethod() refers to the one declared in Subclass, which overrides the one in Superclass. So, to refer to printMethod() inherited from Superclass, Subclass must use a qualified name, using super as shown.
Subclass constructors
A subclass constructor can invoke the superclass constructor. Invocation of a superclass constructor must be the first line in the subclass constructor.
The syntax for calling a superclass constructor is super() (which invokes the no-argument constructor of the superclass) or super(parameters) (to invoke the superclass constructor with a matching parameter list).
The following example illustrates how to use the super keyword to invoke a superclass's constructor. Recall from the Bicycle example that MountainBike is a subclass of Bicycle. Here is the MountainBike (subclass) constructor that calls the superclass constructor and then adds some initialization code of its own (i.e., seatHeight = startHeight;):
public MountainBike(
        int startHeight, int startSpeed, int startGear) {

    super(startSpeed, startGear);
    seatHeight = startHeight;
}
Note: If a constructor does not explicitly invoke a superclass constructor, the Java compiler automatically inserts a call to the no-argument constructor of the superclass. If the superclass does not have a no-argument constructor, you will get a compile-time error. Object does have such a constructor, so if Object is the only superclass, there is no problem.
Access modifiers (simplified)
Access level modifiers determine whether other classes can use a particular field or invoke a particular method. Given below is a simplified version of Java access modifiers, assuming you have not yet started placing your classes in different packages i.e., all classes are placed in the root level. A full explanation of access modifiers is given in a later topic.
There are two levels of access control:
At the class level:
public: the class is visible to all other classes- no modifier: same as
public
At the member level:
public: the member is visible to all other classesprotected: same aspublic- no modifier: same as
public private: the member is not visible to other classes (but can be accessed in its own class)
Background: Suppose we are creating a software to manage various tasks a person has to do. Two types of such tasks are,
- Todos: i.e., things that needs to be done some day e.g., 'Read the book Lord of the Rings'
- Deadlines: i.e., things to be done by a specific date/time e.g., 'Read the text book by Nov 25th'
The Task class is given below:
public class Task {
    protected String description;

    public Task(String description) {
        this.description = description;
    }

    public String getDescription() {
        return description;
    }
}
- Write a
Todoclass that inherits from theTaskclass.- It should have an additional
booleanfieldisDoneto indicate whether the todo is done or not done. - It should have a
isDone()method to access theisDonefield and asetDone(boolean)method to set theisDonefield.
- It should have an additional
- Write a
Deadlineclass that inherits from theTodoclass that you implemented in the previous step. It should have,- an additional
Stringfieldbyto store the details of when the task to be done e.g.,Jan 25th 5pm - a
getBy()method to access the value of thebyfield, and a correspondingsetBy(String)method. - a constructor of the form
Deadline(String description, String by)
- an additional
The expected behavior of the two classes is as follows:
public class Main {
    public static void main(String[] args) {
        // create a todo task and print details
        Todo t = new Todo("Read a good book");
        System.out.println(t.getDescription());
        System.out.println(t.isDone());

        // change todo fields and print again
        t.setDone(true);
        System.out.println(t.isDone());

        // create a deadline task and print details
        Deadline d = new Deadline("Read textbook", "Nov 16");
        System.out.println(d.getDescription());
        System.out.println(d.isDone());
        System.out.println(d.getBy());

        // change deadline details and print again
        d.setDone(true);
        d.setBy("Postponed to Nov 18th");
        System.out.println(d.isDone());
        System.out.println(d.getBy());
    }
}
Read a good book
false
true
Read textbook
false
Nov 16
true
Postponed to Nov 18th
Hint
Can use Object class
As you know, all Java objects inherit from the Object class. Let us look at some of the useful methods in the Object class that can be used by other classes.
The toString method
Every class inherits a toString method from the Object class that is used by Java to get a string representation of the object e.g., for printing. By default, it simply returns the type of the object and its address (in hexadecimal).
Suppose you defined a class called Time, to represent a moment in time. If you create a Time object and display it with println:
class Time {
    int hours;
    int minutes;
    int seconds;

    Time(int hours, int minutes, int seconds) {
        this.hours = hours;
        this.minutes = minutes;
        this.seconds = seconds;
    }
}
 Time t = new Time(5, 20, 13);
 System.out.println(t);
Time@80cc7c0 (the address part can vary)
You can override the toString method in your classes to provide a more meaningful string representation of the objects of that class.
Here's an example of overriding the toString method of the Time class:
class Time{

     //...

     @Override
     public String toString() {
         return String.format("%02d:%02d:%02d\n",
                 this.hours, this.minutes, this.seconds);
     }
}
 Time t = new Time(5, 20, 13);
 System.out.println(t);
05:20:13
@Override is an optional annotation you can use to indicate that the method is overriding a method from the parent class.
The equals method
There are two ways to check whether values are equal: the == operator and the equals method. With objects you can use either one, but they are not the same.
- The
==operator checks whether objects are identical; that is, whether they are the same object. - The
equalsmethod checks whether they are equivalent; that is, whether they have the same value.
The definition of identity is always the same, so the == operator always does the same thing.
Consider the following variables:
Time time1 = new Time(9, 30, 0);
Time time2 = time1;
Time time3 = new Time(9, 30, 0);
- The assignment operator copies references, so
time1andtime2refer to the same object. Because they are identical,time1 == time2istrue. - But
time1andtime3refer to different objects. Because they are not identical,time1 == time3isfalse.
By default, the equals method inherited from the Object class does the same thing as ==. As the definition of equivalence is different for different classes, you can override the equals method to define your own criteria for equivalence of objects of your class.
Here's how you can override the equals method of the Time class to provide an equals method that considers two Time objects equivalent as long as they represent the same time of the day:
public class Time {
    int hours;
    int minutes;
    int seconds;

    // ...

    @Override
    public boolean equals(Object o) {
        Time other = (Time) o;
        return this.hours == other.hours
                && this.minutes == other.minutes
                && this.seconds == other.seconds;
    }
}
Time t1 = new Time(5, 20, 13);
Time t2 = new Time(5, 20, 13);
System.out.println(t1 == t2);
System.out.println(t1.equals(t2));
false
true
Note that a proper equals method implementation is more complex than the example above. See the article How to Implement Java’s equals Method Correctly by Nicolai Parlog for a detailed explanation before you implement your own equals method.
Suppose you have the following classes Task, Todo, Deadline:
public class Task {
    protected String description;

    public Task(String description) {
        this.description = description;
    }

    public String getDescription() {
        return description;
    }
}
public class Todo extends Task {
    protected boolean isDone;

    public Todo(String description) {
        super(description);
        isDone = false;
    }

    public void setDone(boolean done) {
        isDone = done;
    }

    public boolean isDone() {
        return isDone;
    }
}
public class Deadline extends Todo {

    protected String by;

    public Deadline(String description, String by) {
        super(description);
        this.by = by;
    }

    public void setBy(String by) {
        this.by = by;
    }

    public String getBy() {
        return by;
    }
}
Override the toString method of the three classes to produce the following behavior.
public class Main {
    public static void main(String[] args) {
        // create a todo task and print it
        Todo t = new Todo("Read a good book");
        System.out.println(t);

        // change todo fields and print again
        t.setDone(true);
        System.out.println(t);

        // create a deadline task and print it
        Deadline d = new Deadline("Read textbook", "Nov 16");
        System.out.println(d);

        // change deadline details and print again
        d.setDone(true);
        d.setBy("Postponed to Nov 18th");
        System.out.println(d);
    }
}
description: Read a good book
is done? No
description: Read a good book
is done? Yes
description: Read textbook
is done? No
do by: Nov 16
description: Read textbook
is done? Yes
do by: Postponed to Nov 18th
You can use the super.toString from the subclass to invoke the behavior of the method you are overriding. This is useful here because the overriding method is simply adding onto the behavior of the overridden method.
Hint
Can explain OOP polymorphism
Polymorphism:
The ability of different objects to respond, each in its own way, to identical messages is called polymorphism. -- Object-Oriented Programming with Objective-C, Apple
Polymorphism allows you to write code targeting superclass objects, use that code on subclass objects, and achieve possibly different results based on the actual class of the object.
Assume classes Cat and Dog are both subclasses of the Animal class. You can write code targeting Animal objects and use that code on Cat and Dog objects, achieving possibly different results based on whether it is a Cat object or a Dog object. Some examples:
- Declare an array of type
Animaland still be able to storeDogandCatobjects in it. - Define a method that takes an
Animalobject as a parameter and yet be able to passDogandCatobjects to it. - Call a method on a
Dogor aCatobject as if it is anAnimalobject (i.e., without knowing whether it is aDogobject or aCatobject) and get a different response from it based on its actual class e.g., call theAnimalclass's methodspeak()on objectaand get a"Meow"as the return value ifais aCatobject and"Woof"if it is aDogobject.
Polymorphism literally means "ability to take many forms".
Paradigms → Object Oriented Programming → Inheritance → What
Can explain substitutability
Every instance of a subclass is an instance of the superclass, but not vice-versa. As a result, inheritance allows substitutability: the ability to substitute a child class object where a parent class object is expected.
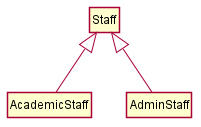
An AcademicStaff is an instance of a Staff, but a Staff is not necessarily an instance of an AcademicStaff. i.e. wherever an object of the superclass is expected, it can be substituted by an object of any of its subclasses.
The following code is valid because an AcademicStaff object is substitutable as a Staff object.
Staff staff = new AcademicStaff(); // OK
But the following code is not valid because staff is declared as a Staff type and therefore its value may or may not be of type AcademicStaff, which is the type expected by variable academicStaff.
Staff staff;
...
AcademicStaff academicStaff = staff; // Not OK
Can explain dynamic and static binding
Dynamic binding (There are subtle differences between late binding and dynamic binding, but they are beyond the scope of this documentaka late binding): a mechanism where method calls in code are deciding which method implementation to executeresolved at at the moment the method call is executedruntime, rather than at compile time.
Overridden methods are resolved using dynamic binding, and therefore resolves to the implementation in the actual type of the object.
Consider the code below. The declared type of s is Staff and it appears as if the adjustSalary(int) operation of the Staff class is invoked.
void adjustSalary(int byPercent) {
    for (Staff s: staff) {
        s.adjustSalary(byPercent);
    }
}
However, at runtime s can receive an object of any subclass of Staff. That means the adjustSalary(int) operation of the actual subclass object will be called. If the subclass does not override that operation, the operation defined in the superclass (in this case, Staff class) will be called.
Static binding (aka early binding): When a method call is resolved at compile time.
In contrast, overloaded methods are resolved using static binding.
Note how the constructor is overloaded in the class below. The method call new Account() is bound to the first constructor at compile time.
class Account {

    Account() {
        // Signature: ()
        ...
    }

    Account(String name, String number, double balance) {
        // Signature: (String, String, double)
        ...
    }
}
Similarly, the calculateGrade method is overloaded in the code below and a method call calculateGrade("A1213232") is bound to the second implementation, at compile time.
void calculateGrade(int[] averages) { ... }
void calculateGrade(String matric) { ... }
Paradigms → Object Oriented Programming → Inheritance → Substitutability
Can explain how substitutability operation overriding, and dynamic binding relates to polymorphism
Three concepts combine to achieve polymorphism: substitutability, operation overriding, and dynamic binding.
- Substitutability: Because of substitutability, you can write code that expects objects of a parent class and yet use that code with objects of child classes. That is how polymorphism is able to treat objects of different types as one type.
- Overriding: To get polymorphic behavior from an operation, the operation in the superclass needs to be overridden in each of the subclasses. That is how overriding allows objects of different subclasses to display different behaviors in response to the same method call.
- Dynamic binding: Calls to overridden methods are bound to the implementation of the actual object's class dynamically during the runtime. That is how the polymorphic code can call the method of the parent class and yet execute the implementation of the child class.
Exercises
Can use polymorphism in Java
Java is a strongly-typed language which means the code works with only the object types that it targets.
The following code PetShelter keeps a list of Cat objects and make them speak. The code will not work with any other type, for example, Dog objects.
public class PetShelter {
    private static Cat[] cats = new Cat[]{
            new Cat("Mittens"),
            new Cat("Snowball")};

    public static void main(String[] args) {
        for (Cat c: cats){
            System.out.println(c.speak());
        }
    }
}
Mittens: Meow
Snowball: Meow
The Cat class
This strong-typing can lead to unnecessary verbosity caused by repetitive similar code that do similar things with different object types.
If the PetShelter is to keep both cats and dogs, you'll need two arrays and two loops:
public class PetShelter {
    private static Cat[] cats = new Cat[]{
            new Cat("Mittens"),
            new Cat("Snowball")};
    private static Dog[] dogs = new Dog[]{
            new Dog("Spot")};

    public static void main(String[] args) {
        for (Cat c: cats){
            System.out.println(c.speak());
        }
        for(Dog d: dogs){
            System.out.println(d.speak());
        }
    }
}
Mittens: Meow
Snowball: Meow
Spot: Woof
The Dog class
A better way is to take advantage of polymorphism to write code that targets a superclass so that it works with any subclass objects.
The PetShelter2 uses one data structure to keep both types of animals and one loop to make them speak. The code targets the Animal superclass (assuming Cat and Dog inherits from the Animal class) instead of repeating the code for each animal type.
public class PetShelter2 {
    private static Animal[] animals = new Animal[]{
            new Cat("Mittens"),
            new Cat("Snowball"),
            new Dog("Spot")};

    public static void main(String[] args) {
        for (Animal a: animals){
            System.out.println(a.speak());
        }
    }
}
Mittens: Meow
Snowball: Meow
Spot: Woof
The Animal, Cat, and Dog classes
Explanation: Because Java supports polymorphism, you can store both Cat and Dog objects in an array of Animal objects. Similarly, you can call the speak method on any Animal object (as done in the loop) and yet get different behavior from Cat objects and Dog objects.
Suggestion: try to add an Animal object (e.g., new Animal("Unnamed")) to the animals array and see what happens.
Polymorphic code is better in several ways:
- It is shorter.
- It is simpler.
- It is more flexible (in the above example, the
mainmethod will work even if we add more animal types).
Exercises
The Main class below keeps a list of Circle and Rectangle objects and prints the area (as an int value) of each shape when requested.
Add the missing variables/methods to the code below so that it produces the output given.
public class Main {
    //TODO add your methods here

    public static void main(String[] args) {
        addShape(new Circle(5));
        addShape(new Rectangle(3, 4));
        addShape(new Circle(10));
        printAreas();
        addShape(new Rectangle(4, 4));
        printAreas();
    }
}
78
12
314
78
12
314
16
Circle class and Rectangle class is given below but you'll need to add a parent class Shape:
public class Circle {

    private int radius;

    public Circle(int radius) {
        this.radius = radius;
    }

    public int area() {
        return (int)(Math.PI * radius * radius);
    }
}
public class Rectangle {
    private int height;
    private int width;

    public Rectangle(int height, int width){
        this.height = height;
        this.width = width;
    }

    public int area() {
        return height * width;
    }
}
You may use an array of size 100 to store the shapes.
Partial solution
Can use Java constants
Java does not directly support constants. The convention is to use a static final variable where a constant is needed. The static modifier causes the variable to be available without instantiating an object. The final modifier causes the variable to be unchangeable. Java constants are normally declared in ALL CAPS separated by underscores.
Here is an example of a constant named MAX_BALANCE which can be accessed as Account.MAX_BALANCE.
public class Account{

  public static final double MAX_BALANCE = 1000000.0;

}
Math.PI is an example constant that comes with Java.
Can explain the meaning of enumerations
An Enumeration is a fixed set of values that can be considered as a data type. An enumeration is often useful when using a regular data type such as int or String would allow invalid values to be assigned to a variable.
Suppose you want a variable called priority to store the priority of something. There are only three priority levels: high, medium, and low. You can declare the variable priority as of type int and use only values 2, 1, and 0 to indicate the three priority levels. However, this opens the possibility of an invalid value such as 9 being assigned to it. But if you define an enumeration type called Priority that has three values HIGH, MEDIUM and LOW only, a variable of type Priority will never be assigned an invalid value because the compiler is able to catch such an error.
Priority: HIGH, MEDIUM, LOW
Can use Java enumerations
You can define an enum type by using the enum keyword. Because they are constants, the names of an enum type's fields are in uppercase letters e.g., FLAG_SUCCESS by convention.
Defining an enumeration to represent days of a week (code to be put in the Day.java file):
public enum Day {
    SUNDAY, MONDAY, TUESDAY, WEDNESDAY,
    THURSDAY, FRIDAY, SATURDAY
}
Some examples of using the Day enumeration defined above:
Day today = Day.MONDAY;
Day[] holidays = new Day[]{Day.SATURDAY, Day.SUNDAY};

switch (today) {
case SATURDAY:
case SUNDAY:
    System.out.println("It's the weekend");
    break;
default:
    System.out.println("It's a week day");
}
Note that while enumerations are usually a simple set of fixed values, Java enumerations can have behaviors too, as explained in this tutorial from -- Java Tutorial
Define an enumeration named Priority. Add the missing describe method to the code below so that it produces the output given.
public class Main {

    // Add your method here

    public static void main(String[] args) {
        describe("Red", Priority.HIGH);
        describe("Orange", Priority.MEDIUM);
        describe("Blue", Priority.MEDIUM);
        describe("Green", Priority.LOW);
    }
}
Red indicates high priority
Orange indicates medium priority
Blue indicates medium priority
Green indicates low priority
Hint
Can explain the importance of code quality
Always code as if the person who ends up maintaining your code will be a violent psychopath who knows where you live. -- Martin Golding
Production code needs to be of high quality. Given how the world is becoming increasingly dependent on software, poor quality code is something no one can afford to tolerate.
Production CodeCan explain the need for following a standard
One essential way to improve code quality is to follow a consistent style. That is why software engineers follow a strict coding standard (aka style guide).
The aim of a coding standard is to make the entire code base look like it was written by one person. A coding standard is usually specific to a programming language and specifies guidelines such as the locations of opening and closing braces, indentation styles and naming styles (e.g. whether to use Hungarian style, Pascal casing, Camel casing, etc.). It is important that the whole team/company uses the same coding standard and that the standard is generally not inconsistent with typical industry practices. If a company's coding standard is very different from what is typically used in the industry, new recruits will take longer to get used to the company's coding style.
IDEs can help to enforce some parts of a coding standard e.g. indentation rules.
Exercises
Tools → Git & GitHub → Clone
Can pull changes from a repo
Here's a scenario you can try in order to learn how to pull commits from another repo to yours.
1. Clone a repo (e.g., the repo used in [Git & GitHub → Clone]) to be used for this activity.
2. Delete the last few commits to simulate cloning the repo a few commits ago.
Right-click the target commit (i.e. the commit that is 2 commits behind the tip) and choose Reset current branch to this commit.

Choose the Hard - … option and click OK.

This is what you will see.
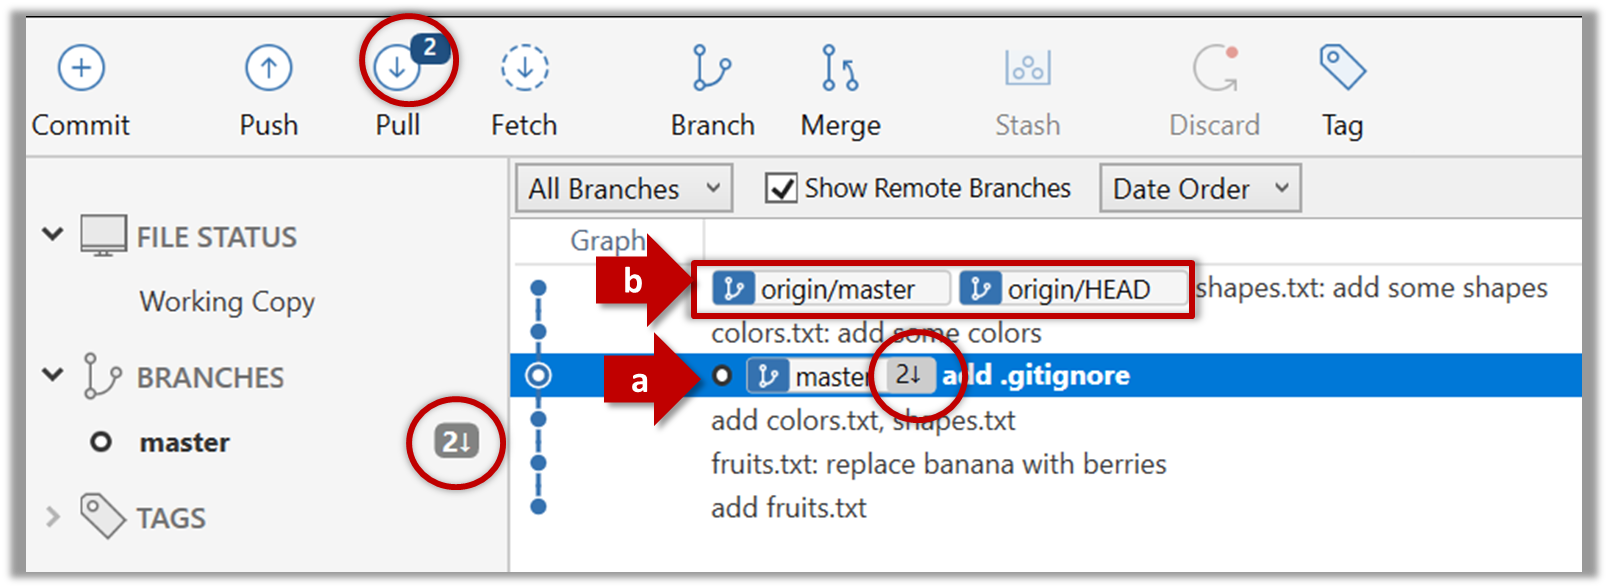
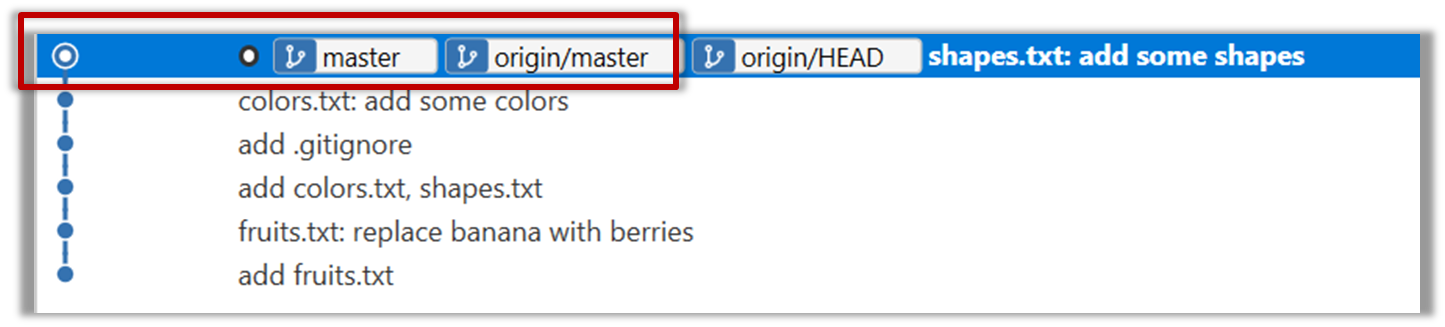
Note the following (cross refer the screenshot above):
Arrow marked as a: The local repo is now at this commit, marked by the master label.
Arrow marked as b: The origin/master label shows what is the latest commit in the master branch in the remote repo.
Use the reset command to delete commits at the tip of the revision history.
git reset --hard HEAD~2
Now, your local repo state is exactly how it would be if you had cloned the repo 2 commits ago, as if somebody has added two more commits to the remote repo since you cloned it.
3. Pull from the other repo: To get those missing commits to your local repo (i.e. to sync your local repo with upstream repo) you can do a pull.
Click the Pull button in the main menu, choose origin and master in the next dialog, and click OK.
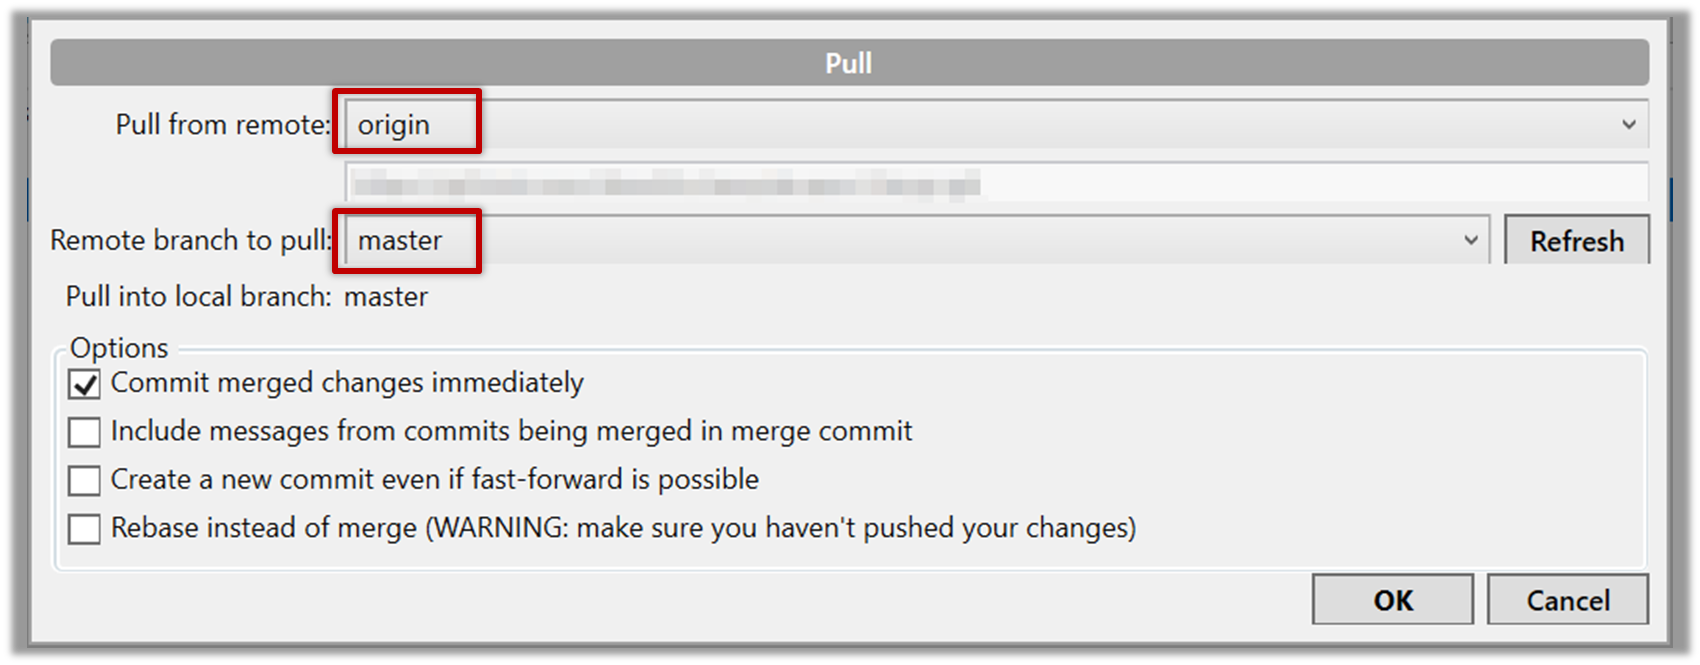
Now you should see something like this where master and origin/master are both pointing the same commit.
git pull origin
You can also do a fetch instead of a pull in which case the new commits will be downloaded to your repo but the working directory will remain at the current commit. To move the current state to the latest commit that was downloaded, you need to do a merge. A pull is a shortcut that does both those steps in one go.
Working with multiple remotes
When you clone a repo, Git automatically adds a remote repo named origin to your repo configuration. As you know, you can pull commits from that repo. As you know, a Git repo can work with remote repos other than the one it was cloned from.
To communicate with another remote repo, you can first add it as a remote of your repo. Here is an example scenario you can follow to learn how to pull from another repo:
Open the local repo in SourceTree. Suggested: Use your local clone of the
samplerepo-thingsrepo.Choose
Repository→Repository Settingsmenu option.Add a new remote to the repo with the following values.

Remote name: the name you want to assign to the remote repo e.g.,upstream1URL/path: the URL of your repo (ending in.git) that. Suggested:https://github.com/se-edu/samplerepo-things-2.git(samplerepo-things-2is another repo that has a shared history withsamplerepo-things)Username: your GitHub username
Now, you can pull from the added repo as you did before but choose the remote name of the repo you want to pull from (instead of
origin):
If the
Remote branch to pulldropdown is empty, click theRefreshbutton on its right.If the pull from the
samplerepo-things-2was successful, you should have received one more commit into your local repo.
Navigate to the folder containing the local repo.
Set the new remote repo as a remote of the local repo.
command:git remote add {remote_name} {remote_repo_url}
e.g.,git remote add upstream1 https://github.com/johndoe/foobar.gitNow you can pull from the new remote.
e.g.,git pull upstream1 master
Can create PRs on GitHub
Suppose you want to propose some changes to a GitHub repo (e.g., samplerepo-pr-practice) as a pull request (PR). Here is a scenario you can try in order to learn how to create PRs:
1. Fork the repo onto your GitHub account.
2. Clone it onto your computer.
3. Commit your changes e.g., add a new file with some contents and commit it.
- Option A - Commit changes to the
masterbranch - Option B - Commit to a new branch e.g., create a branch named
add-intro(remember to switch to themasterbranch before creating a new branch) and add your commit to it.
4. Push the branch you updated (i.e., master branch or the new branch) to your fork, as explained here.
5. Initiate the PR creation:
Go to your fork.
Click on the Pull requests tab followed by the New pull request button. This will bring you to the 'Comparing changes' page.
Set the appropriate target repo and the branch that should receive your PR, using the
base repositoryandbasedropdowns. e.g.,
base repository: se-edu/samplerepo-pr-practice base: masterNormally, the default value shown in the dropdown is what you want but in case your fork has e.g., the repo you forked from is also a fork of a another repo, which means both of those are considered upstream repos of your forkmultiple upstream repos, the default may not be what you want.
Indicate which repo:branch contains your proposed code, using the
head repositoryandcomparedropdowns. e.g.,
head repository: myrepo/samplerepo-pr-practice compare: master
6. Verify the proposed code: Verify that the diff view in the page shows the exact change you intend to propose. If it doesn't, commit the new code and push to the branchupdate the branch as necessary.
7. Submit the PR:
Click the Create pull request button.
Fill in the PR name and description e.g.,
Name:Add an introduction to the README.md
Description:Add some paragraph to the README.md to explain ... Also add a heading ...If you want to indicate that the PR you are about to create is 'still work in progress, not yet ready', click on the dropdown arrow in the Create pull request button and choose
Create draft pull requestoption.Click the Create pull request button to create the PR.
Go to the receiving repo to verify that your PR appears there in the
Pull requeststab.
The next step of the PR life cycle is the PR review. The members of the repo that received your PR can now review your proposed changes.
- If they like the changes, they can merge the changes to their repo, which also closes the PR automatically.
- If they don't like it at all, they can simply close the PR too i.e., they reject your proposed change.
- In most cases, they will add comments to the PR to suggest further changes. When that happens, GitHub will notify you.
You can update the PR along the way too. Suppose PR reviewers suggested a certain improvement to your proposed code. To update your PR as per the suggestion, you can simply modify the code in your local repo, commit the updated code to the same master branch, and push to your fork as you did earlier. The PR will auto-update accordingly.
Sending PRs using the master branch is less common than sending PRs using separate branches. For example, suppose you wanted to propose two bug fixes that are not related to each other. In that case, it is more appropriate to send two separate PRs so that each fix can be reviewed, refined, and merged independently. But if you send PRs using the master branch only, both fixes (and any other change you do in the master branch) will appear in the PRs you create from it.
To create another PR while the current PR is still under review, create a new branch (remember to switch back to the master branch first), add your new proposed change in that branch, and create a new PR following the steps given above.
It is possible to create PRs within the same repo e.g., you can create a PR from branch feature-x to the master branch, within the same repo. Doing so will allow the code to be reviewed by other developers (using PR review mechanism) before it is merged.
Can explain testing
Testing: Operating a system or component under specified conditions, observing or recording the results, and making an evaluation of some aspect of the system or component. –- source: IEEE
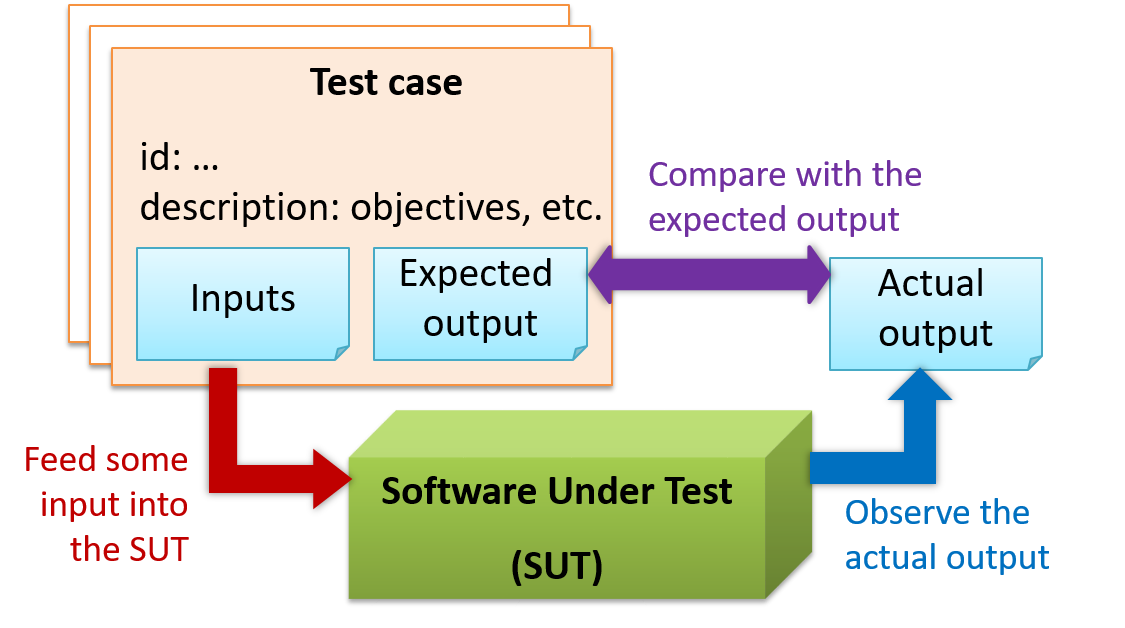
When testing, you execute a set of test cases. A test case specifies how to perform a test. At a minimum, it specifies the input to the software under test (SUT) and the expected behavior.
Example: A minimal test case for testing a browser:
- Input – Start the browser using a blank page (vertical scrollbar disabled). Then, load
longfile.htmllocated in thetest datafolder. - Expected behavior – The scrollbar should be automatically enabled upon loading
longfile.html.
Test cases can be determined based on the specification, reviewing similar existing systems, or comparing to the past behavior of the SUT.
For each test case you should do the following:
- Feed the input to the SUT
- Observe the actual output
- Compare actual output with the expected output
A test case failure is a mismatch between the expected behavior and the actual behavior. A failure indicates a potential defect (or a bug), unless the error is in the test case itself.
Example: In the browser example above, a test case failure is implied if the scrollbar remains disabled after loading longfile.html. The defect/bug causing that failure could be an uninitialized variable.
Exercises
Can explain regression testing
When you modify a system, the modification may result in some unintended and undesirable effects on the system. Such an effect is called a regression.
Regression testing is the re-testing of the software to detect regressions. Note that to detect regressions, you need to retest all related components, even if they had been tested before.
Regression testing is more effective when it is done frequently, after each small change. However, doing so can be prohibitively expensive if testing is done manually. Hence, regression testing is more practical when it is automated.
Exercises
Can explain test automation
An automated test case can be run programmatically and the result of the test case (pass or fail) is determined programmatically. Compared to manual testing, automated testing reduces the effort required to run tests repeatedly and increases precision of testing (because manual testing is susceptible to human errors).
Resources
Can semi-automate testing of CLIs
A simple way to semi-automate testing of a CLI (Command Line Interface) app is by using input/output re-direction.
- First, you feed the app with a sequence of test inputs that is stored in a file while redirecting the output to another file.
- Next, you compare the actual output file with another file containing the expected output.
Let's assume you are testing a CLI app called AddressBook. Here are the detailed steps:
Store the test input in the text file
input.txt.Example
input.txtStore the output you expect from the SUT in another text file
expected.txt.Example
expected.txtRun the program as given below, which will redirect the text in
input.txtas the input toAddressBookand similarly, will redirect the output of AddressBook to a text fileoutput.txt. Note that this does not require any code changes toAddressBook.java AddressBook < input.txt > output.txtThe way to run a CLI program differs based on the language.
e.g., In Python, assuming the code is inAddressBook.pyfile, use the command
python AddressBook.py < input.txt > output.txtIf you are using Windows, use a normal command window to run the app, not a PowerShell window.
Next, you compare
output.txtwith theexpected.txt. This can be done using a utility such as Windows'FC(i.e. File Compare) command, Unix'sdiffcommand, or a GUI tool such as WinMerge.FC output.txt expected.txt
Note that the above technique is only suitable when testing CLI apps, and only if the exact output can be predetermined. If the output varies from one run to the other (e.g. it contains a time stamp), this technique will not work. In those cases, you need more sophisticated ways of automating tests.
CLI application: An application that has a Command Line Interface. i.e. user interacts with the app by typing in commands.
Similar to last week, most topics for this week are TIC2002 topics given here for reference. But there are some new topics too (they are marked by one of these icons: , , , : OPTIONAL)