This site is from a past semester! The current version will be here when the new semester starts.

Week 4 [Fri, Aug 27th] - Topics

Detailed Table of Contents


[W4.1] Java: Casting

W4.1a :

C++ to Java → Miscellaneous Topics → Casting

Can use Java casting

Casting is the action of converting from one type to another. You can use the (newType) syntax to cast a value to a type named newType.

When you cast a primitive value to another type, there may be a loss of precision.

The code below casts a double value to an int value and casts it back to a double. Note the loss of precision.

double d = 5.3;
System.out.println("Before casting to an int: " + d);
int i = (int)d; // cast d to an int
System.out.println("After casting to an int: " + i);
d = (double)i; // cast i back to a double
System.out.println("After casting back a double: " + d);

Before casting to an int: 5.3
After casting to an int: 5
After casting back a double: 5.0

Downcasting is when you cast an object reference from a superclass to a subclass.

Assume the following class hierarchy:

class Animal{
    void speak(){
        System.out.println("I'm an animal");
    }
}

class Cat extends Animal{
    @Override
    void speak() {
        System.out.println("I'm a Cat");
    }
}

class DomesticCat extends Cat{
    @Override
    void speak() {
        System.out.println("I'm a DomesticCat");
    }
}

The foo method below downcasts an Animal object to its subclasses.

public static void foo(Animal a){
    a.speak();
    Cat c = (Cat)a; // downcast a to a Cat
    c.speak();
    DomesticCat dc = (DomesticCat)a; // downcast a to a DomesticCat
    dc.speak();
}

Upcasting is when you cast an object reference from a subclass to a superclass. However, upcasting is done automatically by the compiler even if you do not specify it explicitly.

This example upcasts a Cat object to its superclass Animal:

Cat c = new Cat();
Animal a1 = (Animal)c; //upcasting c to the Animal class
Animal a2 = c; //upcasting is implicit

Note that due to polymorphism, the behavior of the object will reflect the actual type of the object irrespective of the type of the variable holding a reference to it.

The call to the speak() method in the code below always executes the speak() method of the DomesticCat class because the actual type of the object remains DomesticCat although the reference to it is being downcast/upcast to various other types.

Animal a = new DomesticCat(); //implicit upcast
a.speak();
Cat c = (Cat)a; //downcast
c.speak();
DomesticCat dc = (DomesticCat)a; //downcast
dc.speak();

I'm a DomesticCat
I'm a DomesticCat
I'm a DomesticCat

Casting to an incompatible type can result in a ClassCastException at runtime.

This code will cause a ClassCastException:

Object o = new Animal();
Integer x = (Integer)o;

Exception in thread "main" java.lang.ClassCastException: misc.casting.Animal cannot be
cast to java.lang.Integer at misc.casting.CastingExamples.main(CastingExamples.java:14)

You can use the instanceof operator to check if a cast is safe to perform.

This code checks if the object a is an instance of the Cat class before casting it to a Cat.

Cat c;
if (a instanceof Cat){
    c = (Cat)a;
}


[W4.2] OOP + Java: Abstract Classes

W4.2a :

Paradigms → OOP → Inheritance → Abstract classes and methods

Can implement abstract classes

Abstract class: A class declared as an abstract class cannot be instantiated, but it can be subclassed.

You can declare a class as abstract when a class is merely a representation of commonalities among its subclasses in which case it does not make sense to instantiate objects of that class.

The Animal class that exists as a generalization of its subclasses Cat, Dog, Horse, Tiger etc. can be declared as abstract because it does not make sense to instantiate an Animal object.

Abstract method: An abstract method is a method signature without a method implementation.

The move method of the Animal class is likely to be an abstract method as it is not possible to implement a move method at the Animal class level to fit all subclasses because each animal type can move in a different way.

A class that has an abstract method becomes an abstract class because the class definition is incomplete (due to the missing method body) and it is not possible to create objects using an incomplete class definition.


W4.2b :

C++ to Java → Inheritance → Abstract classes and methods

Can use abstract classes and methods

In Java, an abstract method is declared with the keyword abstract and given without an implementation. If a class includes abstract methods, then the class itself must be declared abstract.

The speak method in this Animal class is abstract. Note how the method signature ends with a semicolon and there is no method body. This makes sense as the implementation of the speak method depends on the type of the animal and it is meaningless to provide a common implementation for all animal types.

public abstract class Animal {

    protected String name;

    public Animal(String name){
        this.name = name;
    }
    public abstract String speak();
}

As one method of the class is abstract, the class itself is abstract.

An abstract class is declared with the keyword abstract. Abstract classes can be used as reference type but cannot be instantiated.

This Account class has been declared as abstract although it does not have any abstract methods. Attempting to instantiate Account objects will result in a compile error.

public abstract class Account {

    int number;

    void close(){
        //...
    }
}

Account a; OK to use as a type
a = new Account(); Compile error!

In Java, even a class that does not have any abstract methods can be declared as an abstract class.

When an abstract class is subclassed, the subclass should provide implementations for all of the abstract methods in its superclass or else the subclass must also be declared abstract.

The Feline class below inherits from the abstract class Animal but it does not provide an implementation for the abstract method speak. As a result, the Feline class needs to be abstract too.

public abstract class Feline extends Animal {
    public Feline(String name) {
        super(name);
    }

}

The DomesticCat class inherits the abstract Feline class and provides the implementation for the abstract method speak. As a result, it need not be (but can be) declared as abstract.

public class DomesticCat extends Feline {
    public DomesticCat(String name) {
        super(name);
    }

    @Override
    public String speak() {
        return "Meow";
    }
}
  • Animal a = new Feline("Mittens");
    Compile error! Feline is abstract.
  • Animal a = new DomesticCat("Mittens");
    OK. DomesticCat can be instantiated and assigned to a variable of Animal type (the assignment is allowed by polymorphism).

Exercises

[Key Exercise] print area with abstract Shape

The Main class below keeps a list of Circle and Rectangle objects and prints the area (as an int value) of each shape when requested.

public class Main {
    private static Shape[] shapes = new Shape[100];
    private static int shapeCount = 0;

    public static void addShape(Shape s){
        shapes[shapeCount] = s;
        shapeCount++;
    }

    public static void printAreas(){
        for (int i = 0; i < shapeCount; i++){
            shapes[i].print();
        }
    }

    public static void main(String[] args) {
        addShape(new Circle(5));
        addShape(new Rectangle(3, 4));
        addShape(new Circle(10));
        addShape(new Rectangle(4, 4));
        printAreas();
    }
}

Circle of area 78
Rectangle of area 12
Circle of area 314
Rectangle of area 16

Circle class and Rectangle class is given below:

public class Circle extends Shape {

    private int radius;

    public Circle(int radius) {
        this.radius = radius;
    }

    @Override
    public int area() {
        return (int)(Math.PI * radius * radius);
    }

    @Override
    public void print() {
        System.out.println("Circle of area " + area());
    }
}
public class Rectangle extends Shape {
    private int height;
    private int width;

    public Rectangle(int height, int width){
        this.height = height;
        this.width = width;
    }

    @Override
    public int area() {
        return height * width;
    }

    @Override
    public void print() {
        System.out.println("Rectangle of area " + area());
    }
}

Add the missing Shape class as an abstract class with two abstract methods.

Partial solution


Statements about abstract classes


[W4.3] OOP + Java: Interfaces

W4.3a :

Paradigms → OOP → Inheritance → Interfaces

Can explain interfaces

An interface is a behavior specification i.e. a collection of Just the method signature without any implementationmethod specifications. If a class implements all methods specified in an interfaceimplements the interface, it means the class is able to support the behaviors specified by the said interface.

There are a number of situations in software engineering when it is important for disparate groups of programmers to agree to a "contract" that spells out how their software interacts. Each group should be able to write their code without any knowledge of how the other group's code is written. Generally speaking, interfaces are such contracts. --Oracle Docs on Java

Suppose SalariedStaff is an interface that contains two methods setSalary(int) and getSalary(). AcademicStaff can declare itself as implementing the SalariedStaff interface, which means the AcademicStaff class must implement all the methods specified by the SalariedStaff interface i.e., setSalary(int) and getSalary().

A class implementing an interface results in an is-a relationship, just like in class inheritance.

In the example above, AcademicStaff is a SalariedStaff. An AcademicStaff object can be used anywhere a SalariedStaff object is expected e.g. SalariedStaff ss = new AcademicStaff().


W4.3b :

C++ to Java → Inheritance → Interfaces

Can use interfaces in Java

The text given in this section borrows some explanations and code examples from the -- Java Tutorial.

In Java, an interface is a reference type, similar to a class, mainly containing method signatures. Defining an interface is similar to creating a new class except it uses the keyword interface in place of class.

Here is an interface named DrivableVehicle that defines methods needed to drive a vehicle.

public interface DrivableVehicle {
    void turn(Direction direction);
    void changeLanes(Direction direction);
    void signalTurn(Direction direction, boolean signalOn);
    // more method signatures
}

Note that the method signatures have no braces ({ }) and are terminated with a semicolon.

Interfaces cannot be instantiated—they can only be implemented by classes. When an instantiable class implements an interface, indicated by the keyword implements, it provides a method body for each of the methods declared in the interface.

Here is how a class CarModelX can implement the DrivableVehicle interface.

public class CarModelX implements DrivableVehicle {

    @Override
    public void turn(Direction direction) {
       // implementation
    }

    // implementation of other methods
}

An interface can be used as a type e.g., DrivableVechicle dv = new CarModelX();.

Interfaces can inherit from other interfaces using the extends keyword, similar to a class inheriting another.

Here is an interface named SelfDrivableVehicle that inherits the DrivableVehicle interface.

public interface SelfDrivableVehicle extends DrivableVehicle {
   void goToAutoPilotMode();
}

Note that the method signatures have no braces and are terminated with a semicolon.

Furthermore, Java allows multiple inheritance among interfaces. A Java interface can inherit multiple other interfaces. A Java class can implement multiple interfaces (and inherit from one class).

The design below is allowed by Java. In case you are not familiar with UML notation used: solid lines indicate normal inheritance; dashed lines indicate interface inheritance; the triangle points to the parent.
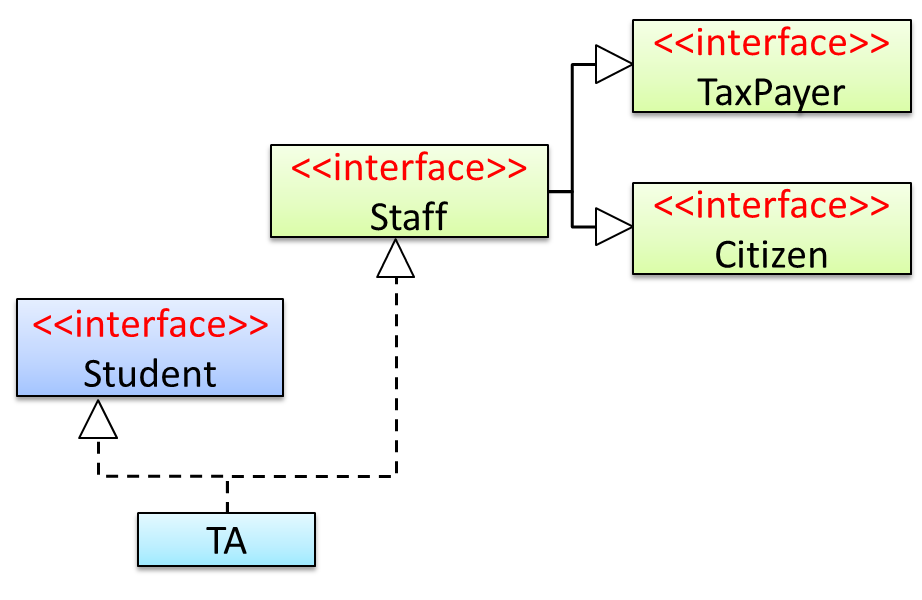
  1. Staff interface inherits (note the solid lines) the interfaces TaxPayer and Citizen.
  2. TA class implements both Student interface and the Staff interface.
  3. Because of point 1 above, TA class has to implement all methods in the interfaces TaxPayer and Citizen.
  4. Because of points 1,2,3, a TA is a Staff, is a TaxPayer and is a Citizen.

Interfaces can also contain constants and static methods.

This example adds a constant MAX_SPEED and a static method isSpeedAllowed to the interface DrivableVehicle.

public interface DrivableVehicle {

    int MAX_SPEED = 150;

    static boolean isSpeedAllowed(int speed){
        return speed <= MAX_SPEED;
    }

    void turn(Direction direction);
    void changeLanes(Direction direction);
    void signalTurn(Direction direction, boolean signalOn);
    // more method signatures
}

Interfaces can contain default method implementations and nested types. They are not covered here.

[Key Exercise] print Printable items

The Main class below passes a list of Printable objects (i.e., objects that implement the Printable interface) for another method to be printed.

public class Main {

    public static void printObjects(Printable[] items) {
        for (Printable p : items) {
            p.print();
        }
    }

    public static void main(String[] args) {
        Printable[] printableItems = new Printable[]{
                new Circle(5),
                new Rectangle(3, 4),
                new Person("James Cook")};

        printObjects(printableItems);
    }
}

Circle of area 78
Rectangle of area 12
Person of name James Cook

Classes Shape, Circle, and Rectangle are given below:

public abstract class Shape {

    public abstract int area();
}
public class Circle extends Shape implements Printable {

    private int radius;

    public Circle(int radius) {
        this.radius = radius;
    }

    @Override
    public int area() {
        return (int)(Math.PI * radius * radius);
    }

    @Override
    public void print() {
        System.out.println("Circle of area " + area());
    }
}
public class Rectangle extends Shape implements Printable {
    private int height;
    private int width;

    public Rectangle(int height, int width){
        this.height = height;
        this.width = width;
    }

    @Override
    public int area() {
        return height * width;
    }

    @Override
    public void print() {
        System.out.println("Rectangle of area " + area());
    }
}

Add the missing Printable interface. Add the missing methods of the Person class given below.

public class Person implements Printable {

    private String name;

    // todo: add missing methods
}

Partial solution


[W4.4] Java: Packages

W4.4a :

C++ to Java → Miscellaneous Topics → Packages

Can use Java packages

You can organize your types (i.e., classes, interfaces, enumerations, etc.) into packages for easier management (among other benefits).

To create a package, you put a package statement at the very top of every source file in that package. The package statement must be the first line in the source file and there can be no more than one package statement in each source file. Furthermore, the package of a type should match the folder path of the source file. Similarly, the compiler will put the .class files in a folder structure that matches the package names.

The Formatter class below (in <source folder>/seedu/tojava/util/Formatter.java file) is in the package seedu.tojava.util. When it is compiled, the Formatter.class file will be in the location <compiler output folder>/seedu/tojava/util:

package seedu.tojava.util;

public class Formatter {
    public static final String PREFIX = ">>";

    public static String format(String s){
        return PREFIX + s;
    }
}

Package names are written in all lower case (not camelCase), using the dot as a separator. Packages in the Java language itself begin with java. or javax. Companies use their reversed Internet domain name to begin their package names.

For example, com.foobar.doohickey.util can be the name of a package created by a company with a domain name foobar.com

To use a public types contained in the packagepackage member from outside its package, you must do one of the following:

  1. Use the type name prefixed by the package name e.g., java.io.IOExceptionfully qualified name to refer to the member
  2. Import the package or the specific package member

The Main class below has two import statements:

  • import seedu.tojava.util.StringParser: imports the class StringParser in the seedu.tojava.util package
  • import seedu.tojava.frontend.*: imports all the classes in the seedu.tojava.frontend package
package seedu.tojava;

import seedu.tojava.util.StringParser;
import seedu.tojava.frontend.*;

public class Main {

    public static void main(String[] args) {

        // Using the fully qualified name to access the Processor class
        String status = seedu.tojava.logic.Processor.getStatus();

        // Using the StringParser previously imported
        StringParser sp = new StringParser();

        // Using classes from the tojava.frontend package
        Ui ui = new Ui();
        Message m = new Message();

    }
}

Note how the class can still use the Processor without importing it first, by using its fully qualified name seedu.tojava.logic.Processor

Importing a package does not import its sub-packages, as packages do not behave as hierarchies despite appearances.

import seedu.tojava.frontend.* does not import the classes in the sub-package seedu.tojava.frontend.widget.

If you do not use a package statement, your type doesn't have a package -- a practice not recommended (except for small code examples) as it is not possible for a type in a package to import a type that is not in a package.

Optionally, a static import can be used to import static members of a type so that the imported members can be used without specifying the type name.

The class below uses static imports to import the constant PREFIX and the method format() from the seedu.tojava.util.Formatter class.

import static seedu.tojava.util.Formatter.PREFIX;
import static seedu.tojava.util.Formatter.format;

public class Main {

    public static void main(String[] args) {

        String formatted = format("Hello");
        boolean isFormatted = formatted.startsWith(PREFIX);
        System.out.println(formatted);
    }
}

Formatter class


Note how the class can use PREFIX and format() (instead of Formatter.PREFIX and Formatter.format()).

When using the commandline to compile/run Java, you should take the package into account.

If the seedu.tojava.Main class is defined in the file Main.java,

  • when compiling from the <source folder>, the command is:
    javac seedu/tojava/Main.java
  • when running it from the <compiler output folder>, the command is:
    java seedu.tojava.Main

Resources


[W4.5] Java: Access Modifiers

W4.5a :

C++ to Java → Miscellaneous Topics → Access modifiers

Can explain access modifiers

Access level modifiers determine whether other classes can use a particular field or invoke a particular method.

There are two levels of access control:

  1. At the class level:

    • public: the class is visible to all classes everywhere
    • no modifier (the default, also known as package-private): it is visible only within its own package

  2. At the member level:

    • public or no modifier (package-private): same meaning as when used with top-level classes
    • private: the member can only be accessed in its own class
    • protected: the member can only be accessed within its own package (as with package-private) and, in addition, by a subclass of its class in another package

The following table shows the access to members permitted by each modifier.

Modifier whether the class itself has access to the member defined by the access levelClass whether classes in the same package as the class (regardless of their parentage) have access to the memberPackage whether subclasses of the class declared outside this package have access to the memberSubclass whether all classes have access to the memberWorld
public
protected
no modifier
private

Access levels affect you in two ways:

  1. When you use classes that come from another source, such as the classes in the Java platform, access levels determine which members of those classes your own classes can use.
  2. When you write a class, you need to decide what access level every member variable and every method in your class should have.


[W4.6] Error Handling: Exceptions

W4.6a :

Implementation → Error Handling → Introduction → What

Can explain error handling

Well-written applications include error-handling code that allows them to recover gracefully from unexpected errors. When an error occurs, the application may need to request user intervention, or it may be able to recover on its own. In extreme cases, the application may log the user off or shut down the system. -- Microsoft


W4.6b :

Implementation → Error Handling → Exceptions → What

Can explain exceptions

Exceptions are used to deal with 'unusual' but not entirely unexpected situations that the program might encounter at runtime.

Exception:

The term exception is shorthand for the phrase "exceptional event." An exception is an event, which occurs during the execution of a program, that disrupts the normal flow of the program's instructions. –- Java Tutorial (Oracle Inc.)

Examples:

  • A network connection encounters a timeout due to a slow server.
  • The code tries to read a file from the hard disk but the file is corrupted and cannot be read.

W4.6c :

Implementation → Error Handling → Exceptions → How

Can explain how exception handling is done typically

Most languages allow code that encountered an "exceptional" situation to encapsulate details of the situation in an Exception object and throw/raise that object so that another piece of code can catch it and deal with it. This is especially useful when the code that encountered the unusual situation does not know how to deal with it.

The extract below from the -- Java Tutorial (with slight adaptations) explains how exceptions are typically handled.

When an error occurs at some point in the execution, the code being executed creates an exception object and hands it off to the runtime system. The exception object contains information about the error, including its type and the state of the program when the error occurred. Creating an exception object and handing it to the runtime system is called throwing an exception.

After a method throws an exception, the runtime system attempts to find something to handle it in the the ordered list of methods that had been called to get to the method where the error occurredcall stack. The runtime system searches the call stack for a method that contains a block of code that can handle the exception. This block of code is called an exception handler. The search begins with the method in which the error occurred and proceeds through the call stack in the reverse order in which the methods were called. When an appropriate handler is found, the runtime system passes the exception to the handler. An exception handler is considered appropriate if the type of the exception object thrown matches the type that can be handled by the handler.

The exception handler chosen is said to catch the exception. If the runtime system exhaustively searches all the methods on the call stack without finding an appropriate exception handler, the program terminates.

Advantages of exception handling in this way:

  • The ability to propagate error information through the call stack.
  • The separation of code that deals with 'unusual' situations from the code that does the 'usual' work.

Exercises


W4.6d :

C++ to Java → Exceptions → What are Exceptions?

Can explain Java Exceptions

Given below is an extract from the -- Java Tutorial, with some adaptations.

There are three basic categories of exceptions In Java:

  • Checked exceptions: exceptional conditions that a well-written application should anticipate and recover from. All exceptions are checked exceptions, except for Error, RuntimeException, and their subclasses.

Suppose an application prompts a user for an input file name, then opens the file by passing the name to the constructor for java.io.FileReader. Normally, the user provides the name of an existing, readable file, so the construction of the FileReader object succeeds, and the execution of the application proceeds normally. But sometimes the user supplies the name of a nonexistent file, and the constructor throws java.io.FileNotFoundException. A well-written program will catch this exception and notify the user of the mistake, possibly prompting for a corrected file name.

  • Errors: exceptional conditions that are external to the application, and that the application usually cannot anticipate or recover from. Errors are those exceptions indicated by Error and its subclasses.

Suppose that an application successfully opens a file for input, but is unable to read the file because of a hardware or system malfunction. The unsuccessful read will throw java.io.IOError. An application might choose to catch this exception, in order to notify the user of the problem — but it also might make sense for the program to print a stack trace and exit.

  • Runtime exceptions: conditions that are internal to the application, and that the application usually cannot anticipate or recover from. Runtime exceptions are those indicated by RuntimeException and its subclasses. These usually indicate programming bugs, such as logic errors or improper use of an API.

Consider the application described previously that passes a file name to the constructor for FileReader. If a logic error causes a null to be passed to the constructor, the constructor will throw NullPointerException. The application can catch this exception, but it probably makes more sense to eliminate the bug that caused the exception to occur.

Errors and runtime exceptions are collectively known as unchecked exceptions.


W4.6e :

C++ to Java → Exceptions → How to use Exceptions

Can use Java Exceptions

The content below uses extracts from the -- Java Tutorial, with some adaptations.

A program can catch exceptions by using a combination of the try, catch blocks.

  • The try block identifies a block of code in which an exception can occur.
  • The catch block identifies a block of code, known as an exception handler, that can handle a particular type of exception.

The writeList() method below calls a method process() that can cause two type of exceptions. It uses a try-catch construct to deal with each exception.

public void writeList() {
    print("starting method");
    try {
        print("starting process");
        process();
        print("finishing process");

    } catch (IndexOutOfBoundsException e) {
        print("caught IOOBE");

    } catch (IOException e) {
        print("caught IOE");

    }
    print("finishing method");
}

Some possible outputs:

No exceptions IOException IndexOutOfBoundsException
starting method
starting process
finishing process
finishing method
starting method
starting process
finishing process
caught IOE
finishing method
starting method
starting process
finishing process
caught IOOBE
finishing method

You can use a finally block to specify code that is guaranteed to execute with or without the exception. This is the right place to close files, recover resources, and otherwise clean up after the code enclosed in the try block.

The writeList() method below has a finally block:

public void writeList() {
    print("starting method");
    try {
        print("starting process");
        process();
        print("finishing process");

    } catch (IndexOutOfBoundsException e) {
        print("caught IOOBE");

    } catch (IOException e) {
        print("caught IOE");

    } finally {
        // clean up
        print("cleaning up");
    }
    print("finishing method");
}

Some possible outputs:

No exceptions IOException IndexOutOfBoundsException
starting method
starting process
finishing process
cleaning up
finishing method
starting method
starting process
finishing process
caught IOE
cleaning up
finishing method
starting method
starting process
finishing process
caught IOOBE
cleaning up
finishing method
  • The try statement should contain at least one catch block or a finally block and may have multiple catch blocks.

  • The class of the exception object indicates the type of exception thrown. The exception object can contain further information about the error, including an error message.

You can use the throw statement to throw an exception. The throw statement requires a Throwable objects are instances of any subclass of the Throwable class.throwable object as the argument.

Here's an example of a throw statement.

if (size == 0) {
    throw new EmptyStackException();
}

In Java, Checked exceptions are subject to the Catch or Specify Requirement: code that might throw checked exceptions must be enclosed by either of the following:

  • A try statement that catches the exception. The try must provide a handler for the exception.
  • A method that specifies that it can throw the exception. The method must provide a throws clause that lists the exception.

Unchecked exceptions are not required to follow to the Catch or Specify Requirement but you can apply the requirement to them too.

Here's an example of a method specifying that it throws certain checked exceptions:

public void writeList() throws IOException, IndexOutOfBoundsException {
    print("starting method");
    process();
    print("finishing method");
}
Some possible outputs:
No exceptions IOException IndexOutOfBoundsException
starting method
finishing method
starting method
finishing method
starting method
finishing method

Java comes with a collection of built-in exception classes that you can use. When they are not enough, it is possible to create your own exception classes.

[Key Exercise] parse rectangle descriptor

The Main class below parses a string descriptor of a rectangle of the format "WIDTHxHEIGHT" e.g., "3x4" and prints the area of the rectangle.

public class Main {

    public static void printArea(String descriptor){
        //TODO: modify the code below
        System.out.println(descriptor + "=" + calculateArea(descriptor));
    }

    private static int calculateArea(String descriptor) {
        //TODO: modify the code below
        String[] dimensions = descriptor.split("x");
        return Integer.parseInt(dimensions[0]) * Integer.parseInt(dimensions[1]);
    }

    public static void main(String[] args) {
        printArea("3x4");
        printArea("5x5");
    }
}

3x4=12
5x5=25
  1. Update the code of printArea to print an error message if WIDTH and/or HEIGHT are not numbers e.g., "Ax4"
    calculateArea will throw the unchecked exception NumberFormatException if the code tries to parse a non-number to an integer.

  2. Update the code of printArea to print an error message if the descriptor is missing WIDTH and/or HEIGHT e.g., "x4"
    calculateArea will throw the unchecked exception IndexOutOfBoundsException if one or both dimensions are missing.

  3. Update the code of calculateArea to throw the checked exception IllegalShapeException if there are more than 2 dimensions e.g., "5x4x3" and update the printArea to print an error message for those cases. Here is the code for the IllegalShapeException.java

public class IllegalShapeException extends Exception {
  //no other code needed
}

Here is the expected behavior after you have done the above changes:

public class Main {

    //...

    public static void main(String[] args) {
        printArea("3x4");
        printArea("3xy");
        printArea("3x");
        printArea("3");
        printArea("3x4x5");
    }
}

3x4=12
WIDTH or HEIGHT is not a number: 3xy
WIDTH or HEIGHT is missing: 3x
WIDTH or HEIGHT is missing: 3
Too many dimensions: 3x4x5

Partial solution


W4.6f :

Implementation → Error Handling → Exceptions → When

Can avoid using exceptions to control normal workflow

In general, use exceptions only for 'unusual' conditions. Use normal return statements to pass control to the caller for conditions that are 'normal'.


[W4.7] Code Quality: Naming

W4.7a :

Implementation → Code Quality → Naming → Introduction

Can explain the need for good names in code

Proper naming improves the readability of code. It also reduces bugs caused by ambiguities regarding the intent of a variable or a method.

There are only two hard things in Computer Science: cache invalidation and naming things. -- Phil Karlton


W4.7b :

Implementation → Code Quality → Naming → Basic → Use nouns for things and verbs for actions

Can improve code quality using technique: use nouns for things and verbs for actions

Every system is built from a domain-specific language designed by the programmers to describe that system. Functions are the verbs of that language, and classes are the nouns.
-- Robert C. Martin, Clean Code: A Handbook of Agile Software Craftsmanship

Use nouns for classes/variables and verbs for methods/functions.

Examples:

Name for a Bad Good
Class CheckLimit LimitChecker
Method result() calculate()

Distinguish clearly between single-valued and multi-valued variables.

Examples:

Good

Person student;
ArrayList<Person> students;

Good

name = 'Jim'
names = ['Jim', 'Alice']

W4.7c :

Implementation → Code Quality → Naming → Basic → Use standard words

Can improve code quality using technique: use standard words

Use correct spelling in names. Avoid 'texting-style' spelling. Avoid foreign language words, slang, and names that are only meaningful within specific contexts/times e.g. terms from private jokes, a TV show currently popular in your country.


W4.7d :

Implementation → Code Quality → Naming → Intermediate → Use name to explain

Can improve code quality using technique: use name to explain

A name is not just for differentiation; it should explain the named entity to the reader accurately and at a sufficient level of detail.

Examples:

Bad Good
processInput() (what 'process'?) removeWhiteSpaceFromInput()
flag isValidInput
temp

If a name has multiple words, they should be in a sensible order.

Examples:

Bad Good
bySizeOrder() orderBySize()

Imagine going to the doctor's and saying "My eye1 is swollen"! Don’t use numbers or case to distinguish names.

Examples:

Bad Bad Good
value1, value2 value, Value originalValue, finalValue

W4.7e :

Implementation → Code Quality → Naming → Intermediate → Not too long, not too short

Can improve code quality using technique: not too long, not too short

While it is preferable not to have lengthy names, names that are 'too short' are even worse. If you must abbreviate or use acronyms, do it consistently. Explain their full meaning at an obvious location.


W4.7f :

Implementation → Code Quality → Naming → Intermediate → Avoid misleading names

Can improve code quality using technique: avoid misleading names

Related things should be named similarly, while unrelated things should NOT.

Example: Consider these variables

  • colorBlack: hex value for color black
  • colorWhite: hex value for color white
  • colorBlue: number of times blue is used
  • hexForRed: hex value for color red

This is misleading because colorBlue is named similar to colorWhite and colorBlack but has a different purpose while hexForRed is named differently but has a very similar purpose to the first two variables. The following is better:

  • hexForBlack hexForWhite hexForRed
  • blueColorCount

Avoid misleading or ambiguous names (e.g. those with multiple meanings), similar sounding names, hard-to-pronounce ones (e.g. avoid ambiguities like "is that a lowercase L, capital I or number 1?", or "is that number 0 or letter O?"), almost similar names.

Examples:

Bad Good Reason
phase0 phaseZero Is that zero or letter O?
rwrLgtDirn rowerLegitDirection Hard to pronounce
right left wrong rightDirection leftDirection wrongResponse right is for 'correct' or 'opposite of 'left'?
redBooks readBooks redColorBooks booksRead red and read (past tense) sounds the same
FiletMignon egg If the requirement is just a name of a food, egg is a much easier to type/say choice than FiletMignon


[W4.8] Code Quality: Readability


Readability

Video

W4.8a :

Implementation → Code Quality → Readability → Basic → Avoid long methods

Can improve code quality using technique: avoid long methods

Be wary when a method is longer than the computer screen, and take corrective action when it goes beyond 30 LOC (lines of code). The bigger the haystack, the harder it is to find a needle.


W4.8b :

Implementation → Code Quality → Readability → Basic → Avoid deep nesting

Can improve code quality using technique: avoid deep nesting

If you need more than 3 levels of indentation, you're screwed anyway, and should fix your program. --Linux 1.3.53 Coding Style

In particular, avoid arrowhead style code.

A real code example:

Bad

int subsidy() {
    int subsidy;
    if (!age) {
        if (!sub) {
            if (!notFullTime) {
                subsidy = 500;
            } else {
                subsidy = 250;
            }
        } else {
            subsidy = 250;
        }
    } else {
        subsidy = -1;
    }
    return subsidy;
}

Good

int calculateSubsidy() {
    int subsidy;
    if (isSenior) {
        subsidy = REJECT_SENIOR;
    } else if (isAlreadySubsidized) {
        subsidy = SUBSIDIZED_SUBSIDY;
    } else if (isPartTime) {
        subsidy = FULLTIME_SUBSIDY * RATIO;
    } else {
        subsidy = FULLTIME_SUBSIDY;
    }
    return subsidy;
}

Bad

def calculate_subs():
    if not age:
        if not sub:
            if not not_fulltime:
                subsidy = 500
            else:
                subsidy = 250
        else:
            subsidy = 250
    else:
        subsidy = -1
    return subsidy
  

Good

def calculate_subsidy():
    if is_senior:
        return REJECT_SENIOR
    elif is_already_subsidized:
        return SUBSIDIZED_SUBSIDY
    elif is_parttime:
        return FULLTIME_SUBSIDY * RATIO
    else:
        return FULLTIME_SUBSIDY

W4.8c :

Implementation → Code Quality → Readability → Basic → Avoid complicated expressions

Can improve code quality using technique: avoid complicated expressions

Avoid complicated expressions, especially those having many negations and nested parentheses. If you must evaluate complicated expressions, have it done in steps (i.e. calculate some intermediate values first and use them to calculate the final value).

Example:

Bad

return ((length < MAX_LENGTH) || (previousSize != length))
        && (typeCode == URGENT);

Good

boolean isWithinSizeLimit = length < MAX_LENGTH;
boolean isSameSize = previousSize != length;
boolean isValidCode = isWithinSizeLimit || isSameSize;

boolean isUrgent = typeCode == URGENT;

return isValidCode && isUrgent;

Example:

Bad

return ((length < MAX_LENGTH) or (previous_size != length)) and (type_code == URGENT)

Good

is_within_size_limit = length < MAX_LENGTH
is_same_size = previous_size != length
is_valid_code = is_within_size_limit or is_same_size

is_urgent = type_code == URGENT

return is_valid_code and is_urgent

The competent programmer is fully aware of the strictly limited size of his own skull; therefore he approaches the programming task in full humility, and among other things he avoids clever tricks like the plague. -- Edsger Dijkstra


W4.8d :

Implementation → Code Quality → Readability → Basic → Avoid magic numbers

Can improve code quality using technique: avoid magic numbers

When the code has a number that does not explain the meaning of the number, it is called a "magic number" (as in "the number appears as if by magic"). Using a e.g., PInamed constant makes the code easier to understand because the name tells us more about the meaning of the number.

Example:

Bad

return 3.14236;
...
return 9;
  

Good

static final double PI = 3.14236;
static final int MAX_SIZE = 10;
...
return PI;
...
return MAX_SIZE - 1;

Note: Python does not have a way to make a variable a constant. However, you can use a normal variable with an ALL_CAPS name to simulate a constant.

Bad

return 3.14236
...
return 9
  

Good

PI = 3.14236
MAX_SIZE = 10
...
return PI
...
return MAX_SIZE - 1

Similarly, you can have ‘magic’ values of other data types.

Bad

return "Error 1432"; // A magic string!
return "Error 1432" # A magic string!

In general, try to avoid any magic literals.


W4.8e :

Implementation → Code Quality → Readability → Basic → Make the code obvious

Can improve code quality using technique: make the code obvious

Make the code as explicit as possible, even if the language syntax allows them to be implicit. Here are some examples:

  • [Java] Use explicit type conversion instead of implicit type conversion.
  • [Java, Python] Use parentheses/braces to show groupings even when they can be skipped.
  • [Java, Python] Use enumerations when a certain variable can take only a small number of finite values. For example, instead of declaring the variable 'state' as an integer and using values 0, 1, 2 to denote the states 'starting', 'enabled', and 'disabled' respectively, declare 'state' as type SystemState and define an enumeration SystemState that has values 'STARTING', 'ENABLED', and 'DISABLED'.

W4.8f :

Implementation → Code Quality → Readability → Intermediate → Structure code logically

Can improve code quality using technique: structure code logically

Lay out the code so that it adheres to the logical structure. The code should read like a story. Just like how you use section breaks, chapters and paragraphs to organize a story, use classes, methods, indentation and line spacing in your code to group related segments of the code. For example, you can use blank lines to group related statements together.

Sometimes, the correctness of your code does not depend on the order in which you perform certain intermediary steps. Nevertheless, this order may affect the clarity of the story you are trying to tell. Choose the order that makes the story most readable.


W4.8g :

Implementation → Code Quality → Readability → Intermediate → Do not 'Trip Up' reader

Can improve code quality using technique: do not 'trip up' reader

Avoid things that would make the reader go ‘huh?’, such as,

  • unused parameters in the method signature
  • similar things that look different
  • different things that look similar
  • multiple statements in the same line
  • data flow anomalies such as, pre-assigning values to variables and modifying it without any use of the pre-assigned value

W4.8h :

Implementation → Code Quality → Readability → Intermediate → Practice KISSing

Can improve code quality using technique: practice KISSing

As the old adage goes, "keep it simple, stupid” (KISS). Do not try to write ‘clever’ code. For example, do not dismiss the brute-force yet simple solution in favor of a complicated one because of some ‘supposed benefits’ such as 'better reusability' unless you have a strong justification.

Debugging is twice as hard as writing the code in the first place. Therefore, if you write the code as cleverly as possible, you are, by definition, not smart enough to debug it. -- Brian W. Kernighan

Programs must be written for people to read, and only incidentally for machines to execute. -- Abelson and Sussman


W4.8i :

Implementation → Code Quality → Readability → Intermediate → Avoid premature optimizations

Can improve code quality using technique: avoid premature optimizations

Optimizing code prematurely has several drawbacks:

  • You may not know which parts are the real performance bottlenecks. This is especially the case when the code undergoes transformations (e.g. compiling, minifying, transpiling, etc.) before it becomes an executable. Ideally, you should use a profiler tool to identify the actual bottlenecks of the code first, and optimize only those parts.
  • Optimizing can complicate the code, affecting correctness and understandability.
  • Hand-optimized code can be harder for the compiler to optimize (the simpler the code, the easier it is for the compiler to optimize). In many cases, a compiler can do a better job of optimizing the runtime code if you don't get in the way by trying to hand-optimize the source code.

A popular saying in the industry is make it work, make it right, make it fast which means in most cases, getting the code to perform correctly should take priority over optimizing it. If the code doesn't work correctly, it has no value no matter how fast/efficient it is.

Premature optimization is the root of all evil in programming. -- Donald Knuth

Note that there are cases where optimizing takes priority over other things e.g. when writing code for resource-constrained environments. This guideline is simply a caution that you should optimize only when it is really needed.


W4.8j :

Implementation → Code Quality → Readability → Intermediate → SLAP hard

Can improve code quality using technique: SLAP hard

Avoid varying the level of abstraction within a code fragment. Note: The book The Productive Programmer (by Neal Ford) calls this the Single Level of Abstraction Principle (SLAP) while the book Clean Code (by Robert C. Martin) calls this One Level of Abstraction per Function.

Example:

Bad (readData(); and salary = basic * rise + 1000; are at different levels of abstraction)

readData();
salary = basic * rise + 1000;
tax = (taxable ? salary * 0.07 : 0);
displayResult();

Good (all statements are at the same level of abstraction)

readData();
processData();
displayResult();

W4.8k :

Implementation → Code Quality → Readability → Advanced → Make the happy path prominent

Can improve code quality using technique: make the happy path prominent

The happy path (i.e. the execution path taken when everything goes well) should be clear and prominent in your code. Restructure the code to make the happy path unindented as much as possible. It is the ‘unusual’ cases that should be indented. Someone reading the code should not get distracted by alternative paths taken when error conditions happen. One technique that could help in this regard is the use of guard clauses.

Example:

Bad

if (!isUnusualCase) {  //detecting an unusual condition
    if (!isErrorCase) {
        start();    //main path
        process();
        cleanup();
        exit();
    } else {
        handleError();
    }
} else {
    handleUnusualCase(); //handling that unusual condition
}

In the code above,

  • unusual condition detections are separated from their handling.
  • the main path is nested deeply.

Good

if (isUnusualCase) { //Guard Clause
    handleUnusualCase();
    return;
}

if (isErrorCase) { //Guard Clause
    handleError();
    return;
}

start();
process();
cleanup();
exit();

In contrast, the above code

  • deals with unusual conditions as soon as they are detected so that the reader doesn't have to remember them for long.
  • keeps the main path un-indented.


[W4.9] Refactoring

Video

W4.9a :

Implementation → Refactoring → What

Can explain refactoring

The first version of the code you write may not be of production quality. It is OK to first concentrate on making the code work, rather than worry over the quality of the code, as long as you improve the quality later. This process of improving a program's internal structure in small steps without modifying its external behavior is called refactoring.

  • Refactoring is not rewriting: Discarding poorly-written code entirely and re-writing it from scratch is not refactoring because refactoring needs to be done in small steps.
  • Refactoring is not bug fixing: By definition, refactoring is different from bug fixing or any other modifications that alter the external behavior (e.g. adding a feature) of the component in concern.

Improving code structure can have many secondary benefits: e.g.

  • hidden bugs become easier to spot
  • improve performance (sometimes, simpler code runs faster than complex code because simpler code is easier for the compiler to optimize).

Given below are two common refactorings ( more).

Refactoring Name: Consolidate Duplicate Conditional Fragments

Situation: The same fragment of code is in all branches of a conditional expression.

Method: Move it outside of the expression.

Example:

if (isSpecialDeal()) {
    total = price * 0.95;
    send();
} else {
    total = price * 0.98;
    send();
}
 → 
if (isSpecialDeal()) {
    total = price * 0.95;
} else {
    total = price * 0.98;
}
send();

if is_special_deal:
    total = price * 0.95
    send()
else:
    total = price * 0.98
    send()
 → 
if is_special_deal:
    total = price * 0.95
else:
    total = price * 0.98
    
send()

Refactoring Name: Extract Method

Situation: You have a code fragment that can be grouped together.

Method: Turn the fragment into a method whose name explains the purpose of the method.

Example:

void printOwing() {
    printBanner();

    // print details
    System.out.println("name:	" + name);
    System.out.println("amount	" + getOutstanding());
}

void printOwing() {
    printBanner();
    printDetails(getOutstanding());
}

void printDetails(double outstanding) {
    System.out.println("name:	" + name);
    System.out.println("amount	" + outstanding);
}
def print_owing():
    print_banner()

    # print details
    print("name:	" + name)
    print("amount	" + get_outstanding())

def print_owing():
    print_banner()
    print_details(get_outstanding())

def print_details(amount):
    print("name:	" + name)
    print("amount	" + amount)

Some IDEs have builtin support for basic refactorings such as automatically renaming a variable/method/class in all places it has been used.

Refactoring, even if done with the aid of an IDE, may still result in regressions. Therefore, each small refactoring should be followed by regression testing.

Exercises


W4.9b

Tools → IntelliJ IDEA → Refactoring

Implementation → Refactoring → What


Can use automated refactoring features of the IDE

This video explains how to automate the 'Extract variable' refactoring using IntelliJ IDEA. Most other refactorings available work similarly. i.e. select the code to refactorfind the refactoring in the context menu or use the keyboard shortcut.

Here's another video explaining how to do some more useful refactorings in Intellij IDEA.


W4.9c :

Implementation → Refactoring → How

W4.9d :

Implementation → Refactoring → When

Can decide when to apply a given refactoring

One way to identify refactoring opportunities is by code smells.

A code smell is a surface indication that usually corresponds to a deeper problem in the system. First, a smell is by definition something that's quick to spot. Second, smells don't always indicate a problem.
--adapted from https://martinfowler.com/bliki/CodeSmell.html

An example (from the same source as above) is the code smell data class i.e., a class with all data and no behavior. When you encounter the such a class, you can explore if refactoring it to move the corresponding behavior into that class is appropriate. Some more examples:

Periodic refactoring is a good way to pay off the technical debt a code base has accumulated.

Software systems are prone to the build up of cruft - deficiencies in internal quality that make it harder than it would ideally be to modify and extend the system further.Technical Debt is a metaphor, coined by Ward Cunningham, that frames how to think about dealing with this cruft, thinking of it like a financial debt. The extra effort that it takes to add new features is the interest paid on the debt.
--https://martinfowler.com/bliki/TechnicalDebt.html

While it is important to refactor frequently so as to avoid the accumulation of ‘messy’ code (aka technical debt), an important question is how much refactoring is too much refactoring? It is too much refactoring when the benefits no longer justify the cost. The costs and the benefits depend on the context. That is why some refactorings are ‘opposites’ of each other (e.g. extract method vs inline method).

Resources


Exercises


[W4.10] RCS: Reviewing pull requests

W4.10a

Tools → Git and GitHub → Reviewing PRs

Video

Can review PRs on GitHub

The PR review stage is a dialog between the PR author and members of the repo that received the PR, in order to refine and eventually merge the PR.

Given below are some steps you can follow when reviewing a PR.

1. Locate the PR:

  1. Go to the GitHub page of the repo.
  2. Click on the Pull requests tab.
  3. Click on the PR you want to review.

2. Read the PR description. It might contain information relevant to reviewing the PR.

3. Click on the Files changed tab to see the diff view.

4. Add review comments:

  1. Hover over the line you want to comment on and click on the icon that appears on the left margin. That should create a text box for you to enter your comment.
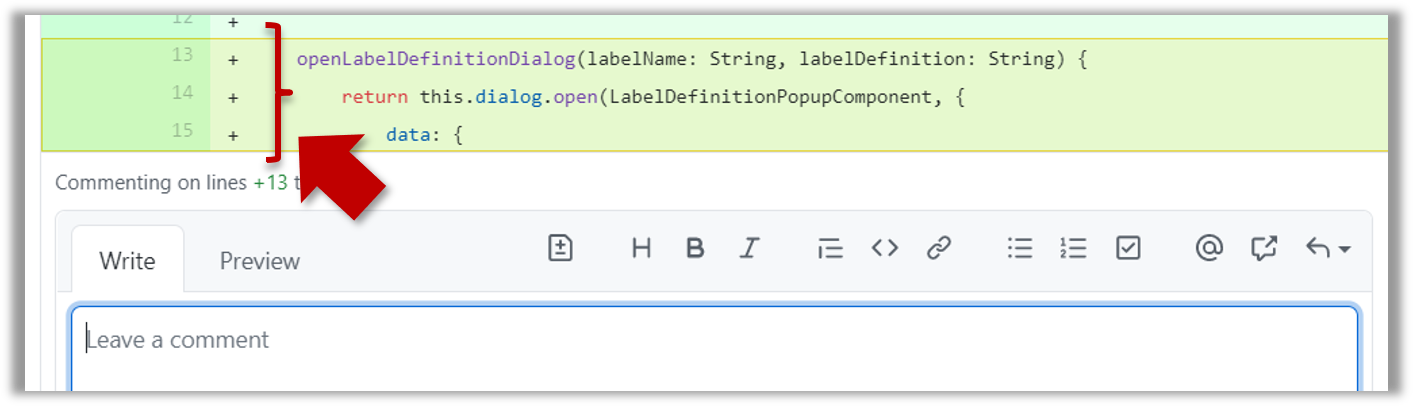
    • To give a comment related to multiple lines, click-and-drag the icon. The result will look like this:
  2. Enter your comment.
    • This page @SE-EDU/guides has some best practices PR reviewers can follow.
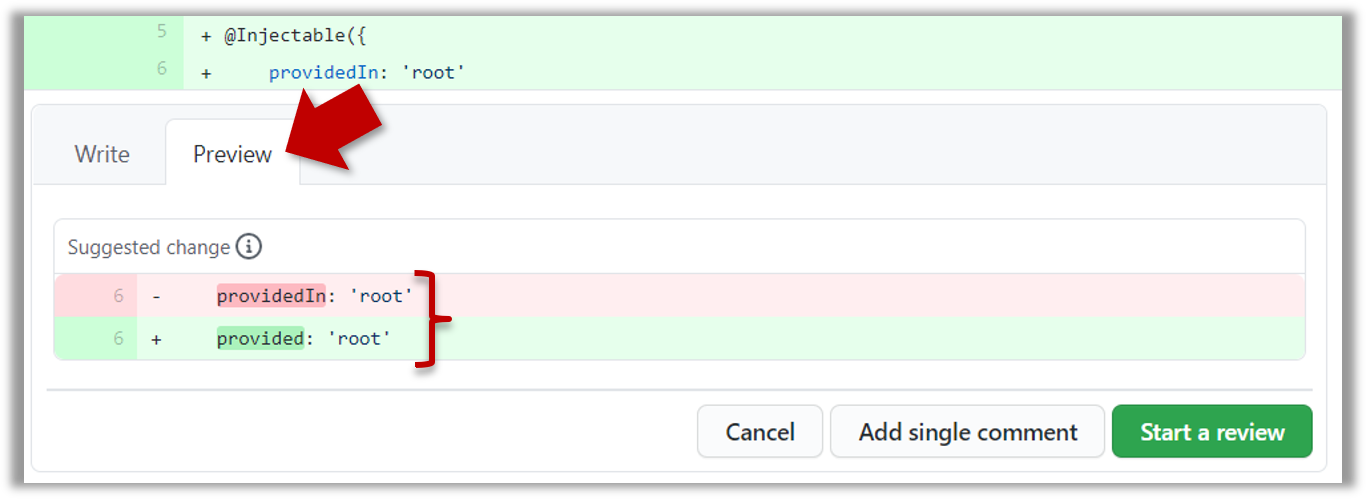
    • To suggest an in-line code change, click on this icon:

      The comment will look like this to the viewers:

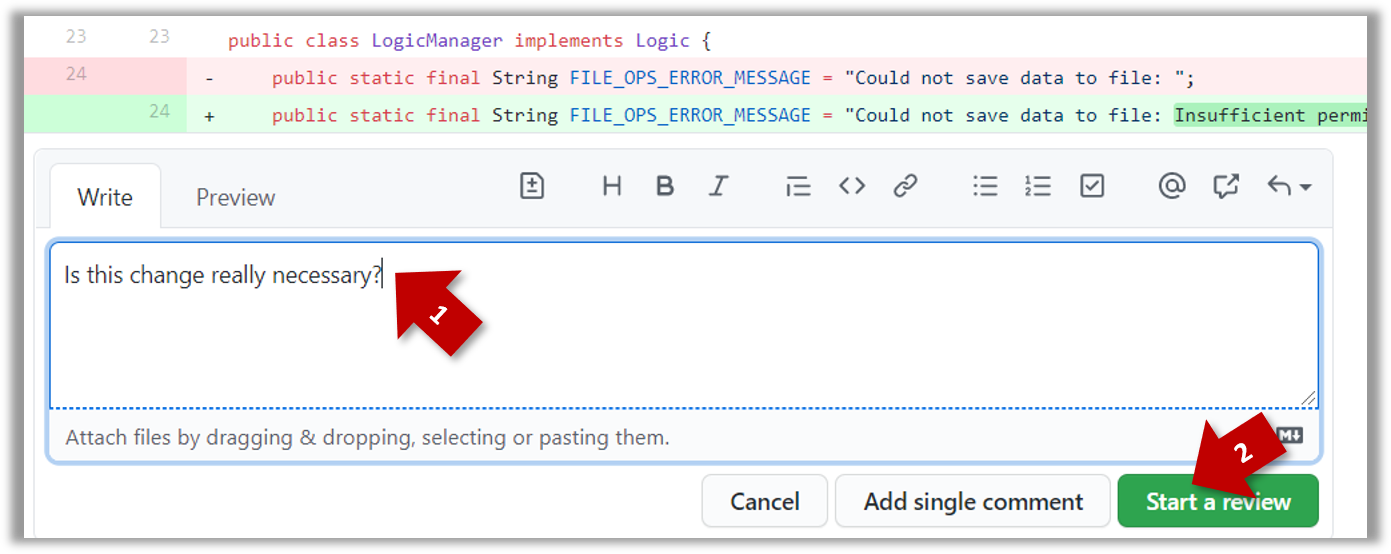
  3. After typing in the comment, click on the Start a review button (not the Add single comment button. This way, your comment is saved but not visible to others yet. It will be visible to others only when you have finished the entire review.

  4. Repeat the above steps to add more comments.

5. Submit the review:

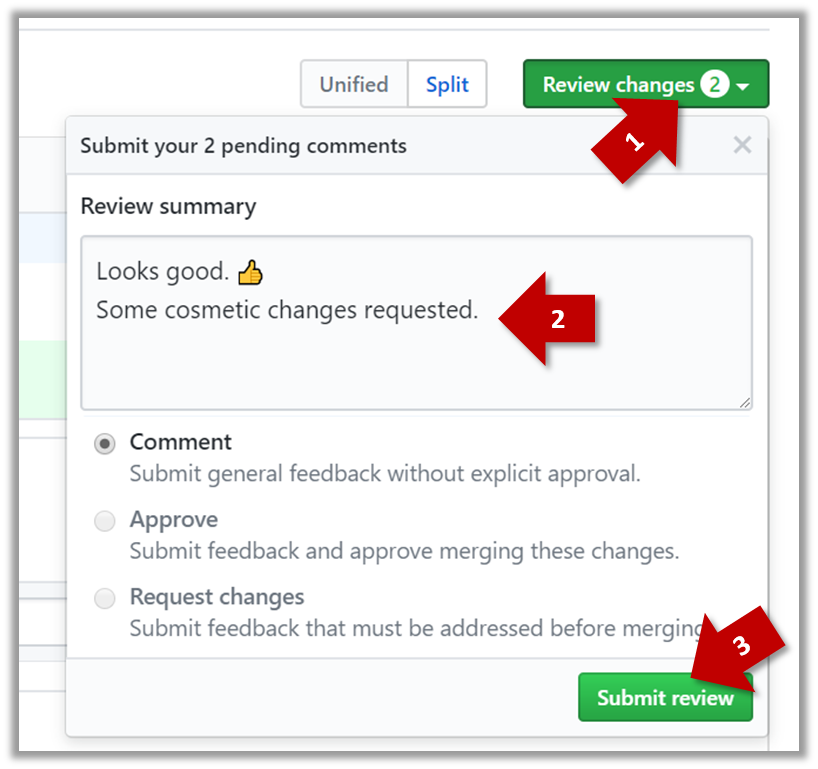
  1. When there are no more comments to add, click on the Review changes button (on the top right of the diff page).
  2. Type in an overall comment about the PR, if any. e.g.,
    Overall, I found your code easy to read for the most part except a few places
    where the nesting was too deep. I noted a few minor coding standard violations
    too. Some of the classes are getting quite long. Consider splitting into
    smaller classes if that makes sense.
    
    LGTM is often used in such overall comments, to indicate Looks good to merge.
    nit is another such term, used to indicate minor flaws e.g., LGTM, almost. Just a few nits to fix..
  3. Choose Approve, Comment, or Request changes option as appropriate and click on the Submit review button.


[W4.11] RCS: Branching

W4.11a :

Project Management → Revision Control → Branching

Video

Can explain branching

Branching is the process of evolving multiple versions of the software in parallel. For example, one team member can create a new branch and add an experimental feature to it while the rest of the team keeps working on another branch. Branches can be given names e.g. master, release, dev.

A branch can be merged into another branch. Merging usually results in a new commit that represents the changes done in the branch being merged.

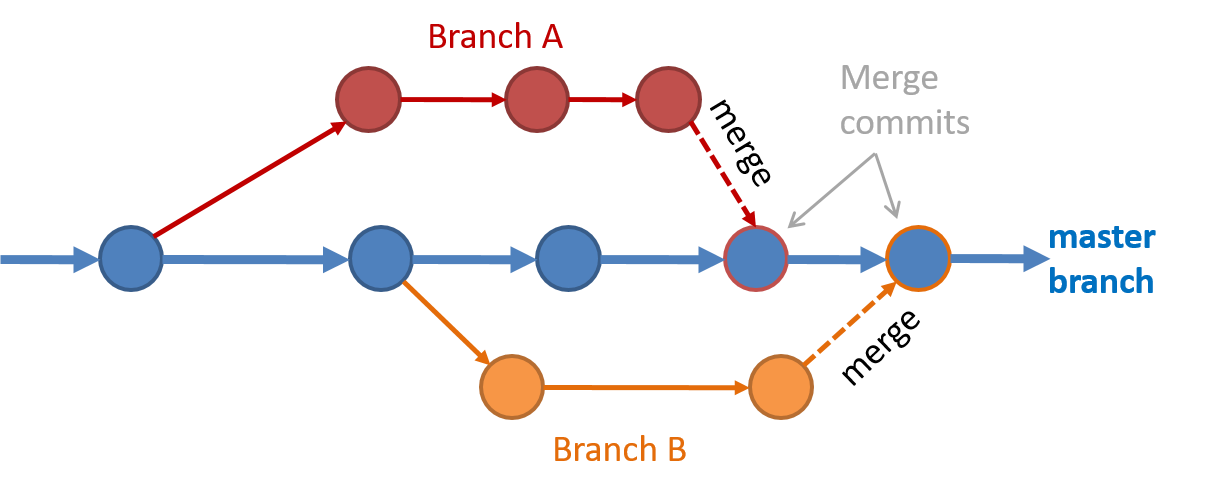
Branching and merging

Merge conflicts happen when you try to merge two branches that had changed the same part of the code and the RCS cannot decide which changes to keep. In those cases, you have to ‘resolve’ the conflicts manually.

Exercises


W4.11b :

Tools → Git and GitHub → branch: Doing multiple parallel changes

Video

Project Management → Revision Control → Branching


Can use Git branching

Git supports branching, which allows you to do multiple parallel changes to the content of a repository.

A Git branch is simply a named label pointing to a commit. The HEAD label indicates which branch you are on. Git creates a branch named master by default. When you add a commit, it goes into the branch you are currently on, and the branch label (together with the HEAD label) moves to the new commit.

Given below is an illustration of how branch labels move as branches evolve.

  1. There is only one branch (i.e., master) and there is only one commit on it.
  2. A new commit has been added. The master and the HEAD labels have moved to the new commit.
  3. A new branch fix1 has been added. The repo has switched to the new branch too (hence, the HEAD label is attached to the fix1 branch).
  4. A new commit (c) has been added. The current branch label fix1 moves to the new commit, together with the HEAD label.
  5. The repo has switched back to the master branch.
  1. A new commit (d) has been added. The master label has moved to that commit.
  2. The repo has switched back to the fix1 branch and added a new commit (e) to it.
  3. The repo has switched to the master branch and the fix1 branch has been merged into the master branch, creating a merge commit f. The repo is currently on the master branch.

Follow the steps below to learn how to work with branches. You can use any repo you have on your computer (e.g. a clone of the samplerepo-things) for this.

0. Observe that you are normally in the branch called master.


git status

on branch master

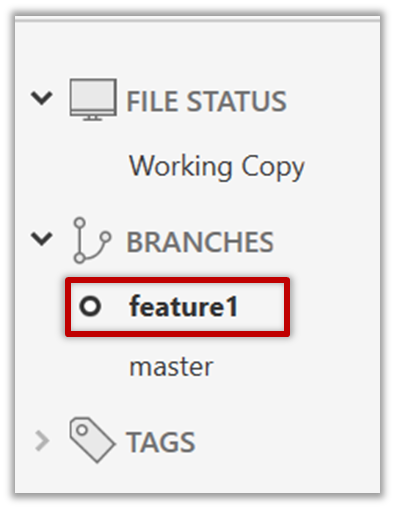
1. Start a branch named feature1 and switch to the new branch.

Click on the Branch button on the main menu. In the next dialog, enter the branch name and click Create Branch.

Note how the feature1 is indicated as the current branch.


You can use the branch command to create a new branch and the checkout command to switch to a specific branch.

git branch feature1
git checkout feature1

One-step shortcut to create a branch and switch to it at the same time:

git checkout –b feature1

2. Create some commits in the new branch. Just commit as per normal. Commits you add while on a certain branch will become part of that branch.
Note how the master label and the HEAD label moves to the new commit (The HEAD label of the local repo is represented as in SourceTree).

3. Switch to the master branch. Note how the changes you did in the feature1 branch are no longer in the working directory.

Double-click the master branch.


git checkout master

4. Add a commit to the master branch. Let’s imagine it’s a bug fix.
To keep things simple for the time being, this commit should not involve the same content that you changed in the feature1 branch. To be on the safe side, this commit can change an entirely different file.

5. Switch back to the feature1 branch (similar to step 3).

6. Merge the master branch to the feature1 branch, giving an end-result like the following. Also note how Git has created a merge commit.

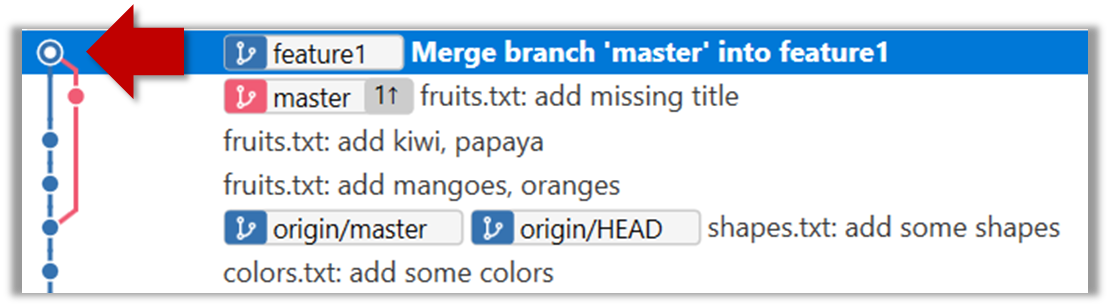
Right-click on the master branch and choose merge master into the current branch. Click OK in the next dialog.


git merge master

The objective of that merge was to sync the feature1 branch with the master branch. Observe how the changes you did in the master branch (i.e. the imaginary bug fix) is now available even when you are in the feature1 branch.

Instead of merging master to feature1, an alternative is to rebase the feature1 branch. However, rebasing is an advanced feature that requires modifying past commits. If you modify past commits that have been pushed to a remote repository, you'll have to force-push the modified commit to the remote repo in order to update the commits in it.

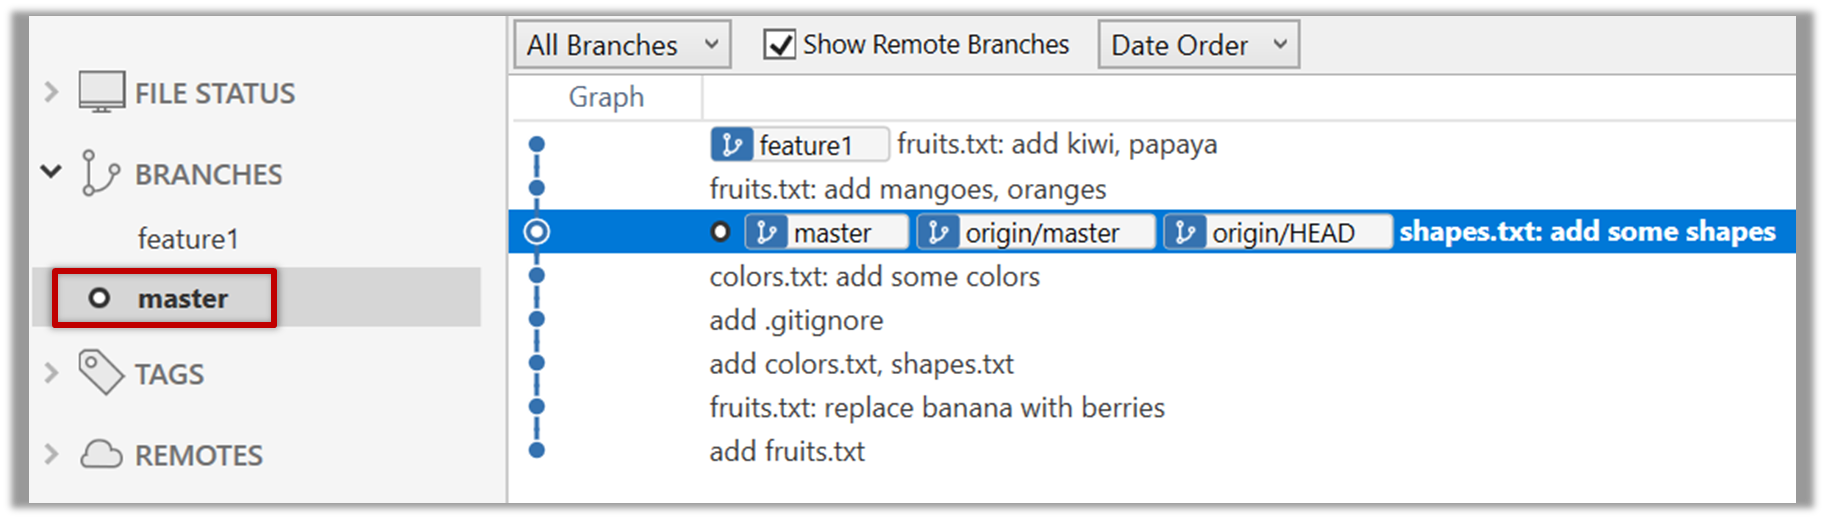
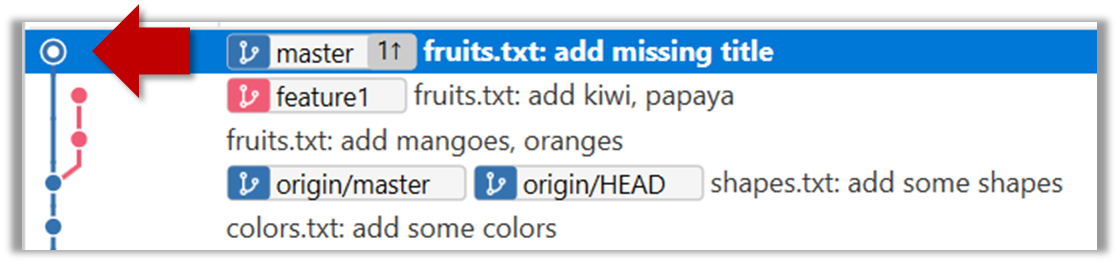
7. Add another commit to the feature1 branch.

8. Switch to the master branch and add one more commit.

9. Merge feature1 to the master branch, giving and end-result like this:

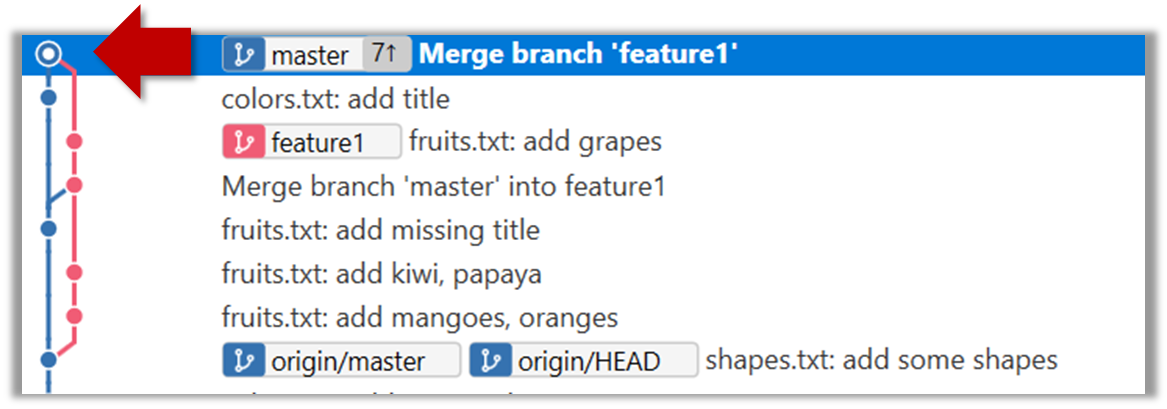
Right-click on the feature1 branch and choose Merge....


git merge feature1

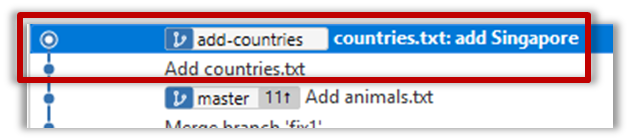
10. Create a new branch called add-countries, switch to it, and add some commits to it (similar to steps 1-2 above). You should have something like this now:

Avoid this common rookie mistake!

Always remember to switch back to the master branch before creating a new branch. If not, your new branch will be created on top of the current branch.

11. Go back to the master branch and merge the add-countries branch onto the master branch (similar to steps 8-9 above). While you might expect to see something like the following,

... you are likely to see something like this instead:

That is because Git does a fast forward merge if possible. Seeing that the master branch has not changed since you started the add-countries branch, Git has decided it is simpler to just put the commits of the add-countries branch in front of the master branch, without going into the trouble of creating an extra merge commit.

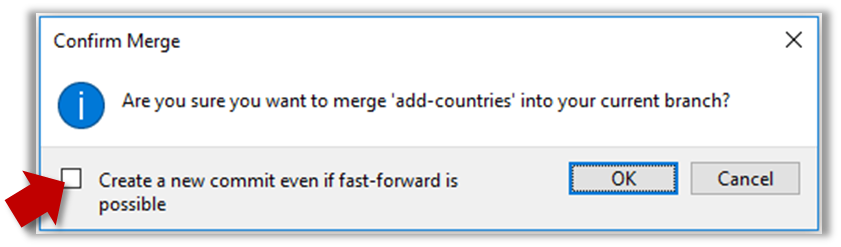
It is possible to force Git to create a merge commit even if fast forwarding is possible.

Tick the box shown below when you merge a branch:


Use the --no-ff switch (short for no fast forward):

git merge --no-ff add-countries

Pushing a branch to a remote repo

Here's how to push a branch to a remote repo:

Here's how to push a branch named add-intro to your own fork of a repo named samplerepo-pr-practice:


Normally: git push {remote repository} {branch}. Examples:

  • git push origin master pushes the master branch to the repo named origin (i.e., the repo you cloned from)
  • git push upstream-repo add-intro pushes the add-intro branch to the repo named upstream-repo

If pushing a branch you created locally to the remote for the first time, add the -u flag to get the local branch to track the new upstream branch:
e.g., git push -u origin add-intro

See git-scm.com/docs/git-push for details of the push command.


W4.11c

Tools → Git and GitHub → Dealing with merge conflicts

Video

Can use Git to resolve merge conflicts

Merge conflicts happen when you try to combine two incompatible versions (e.g., merging a branch to another but each branch changed the same part of the code in a different way).

Here are the steps to simulate a merge conflict and use it to learn how to resolve merge conflicts.

0. Create an empty repo or clone an existing repo, to be used for this activity.

1. Start a branch named fix1 in the repo. Create a commit that adds a line with some text to one of the files.

2. Switch back to master branch. Create a commit with a conflicting change i.e. it adds a line with some different text in the exact location the previous line was added.

3. Try to merge the fix1 branch onto the master branch. Git will pause mid-way during the merge and report a merge conflict. If you open the conflicted file, you will see something like this:

COLORS
------
blue
<<<<<< HEAD
black
=======
green
>>>>>> fix1
red
white

4. Observe how the conflicted part is marked between a line starting with <<<<<< and a line starting with >>>>>>, separated by another line starting with =======.

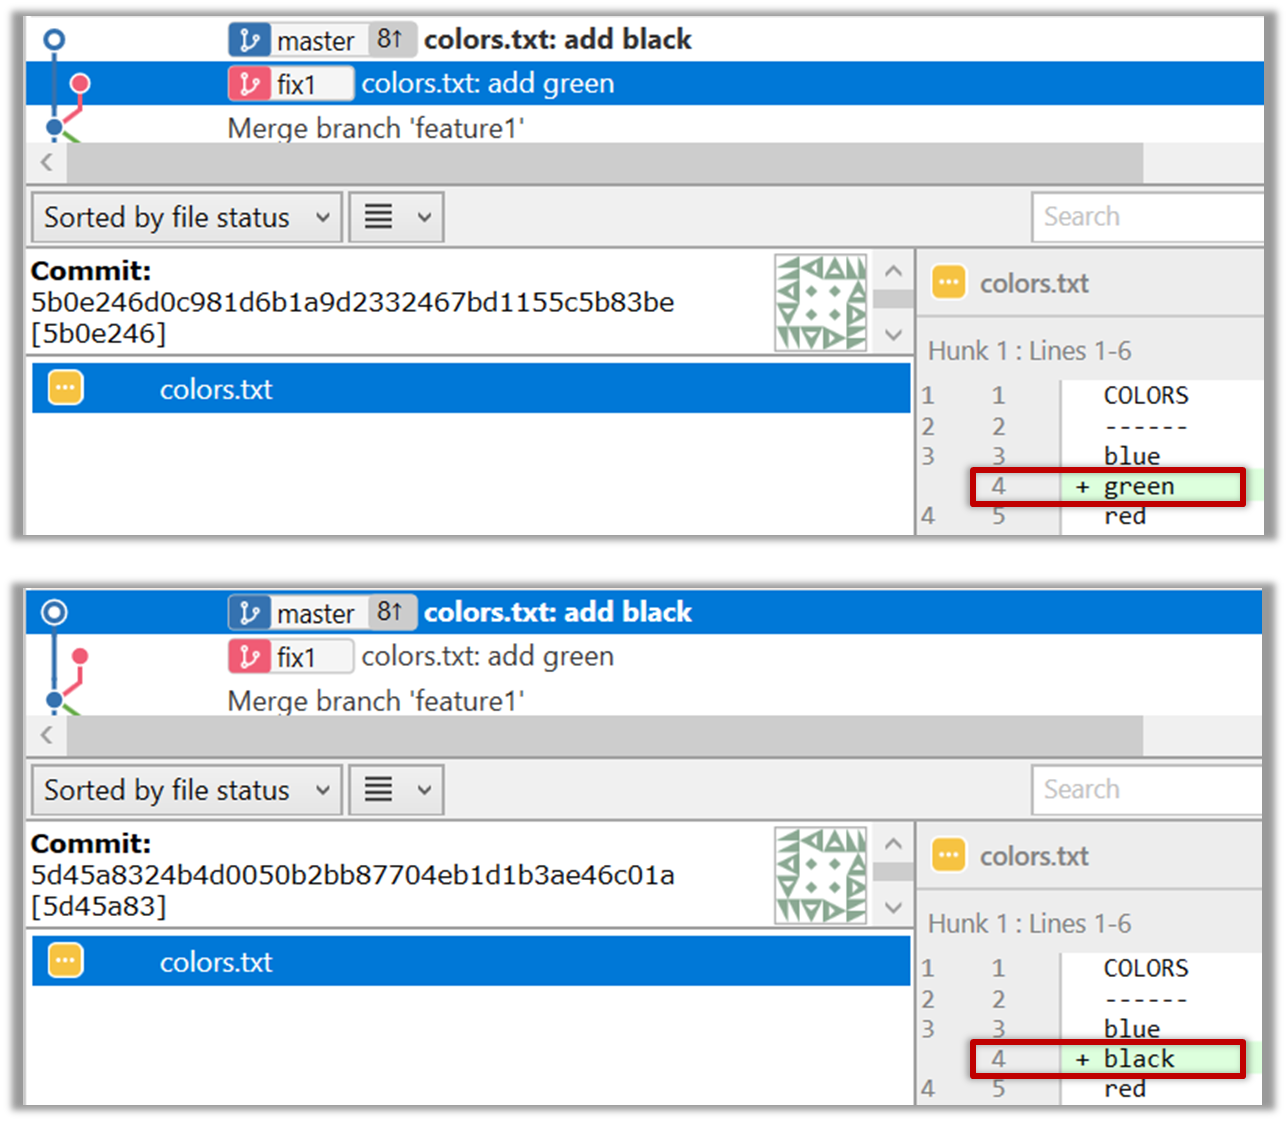
Highlighted below is the conflicting part that is coming from the master branch:

blue
<<<<<< HEAD
black
=======
green
>>>>>> fix1
red

This is the conflicting part that is coming from the fix1 branch:

blue
<<<<<< HEAD
black
=======
green
>>>>>> fix1
red

5. Resolve the conflict by editing the file. Let us assume you want to keep both lines in the merged version. You can modify the file to be like this:

COLORS
------
blue
black
green
red
white

6. Stage the changes, and commit.