This site is from a past semester! The current version will be here when the new semester starts.

Week 6 [Fri, Sep 10th] - Topics

Detailed Table of Contents


[W6.1] IDEs: Intermediate Features

W6.1a :

Implementation → IDEs → Debugging → What

Video

Can explain debugging

Debugging is the process of discovering defects in the program. Here are some approaches to debugging:

  • Bad -- By inserting temporary print statements: This is an ad-hoc approach in which print statements are inserted in the program to print information relevant to debugging, such as variable values. e.g. Exiting process() method, x is 5.347. This approach is not recommended due to these reasons:
    • Incurs extra effort when inserting and removing the print statements.
    • These extraneous program modifications increase the risk of introducing errors into the program.
    • These print statements, if not removed promptly after the debugging, may even appear unexpectedly in the production version.
  • Bad -- By manually tracing through the code: Otherwise known as ‘eye-balling’, this approach doesn't have the cons of the previous approach, but it too is not recommended (other than as a 'quick try') due to these reasons:
    • It is a difficult, time consuming, and error-prone technique.
    • If you didn't spot the error while writing the code, you might not spot the error when reading the code either.
  • Good -- Using a debugger: A debugger tool allows you to pause the execution, then step through the code one statement at a time while examining the internal state if necessary. Most IDEs come with an inbuilt debugger. This is the recommended approach for debugging.

W6.1b

Tools → IntelliJ IDEA → Debugging: Basic

Can step through a program using a debugger

This video (from LaunchCode) gives a pretty good explanation of how to use the IntelliJ IDEA debugger.


W6.1c :

Tools → IntelliJ IDEA → Productivity shortcuts

Can use some useful IDE productivity shortcuts


[W6.2] Code Quality: Unsafe Practices

W6.2a

Implementation → Code Quality → Error-Prone Practices → Introduction

Can explain the need for avoiding error-prone shortcuts

It is safer to use language constructs in the way they are meant to be used, even if the language allows shortcuts. Such coding practices are common sources of bugs. Know them and avoid them.


W6.2b

Implementation → Code Quality → Error-Prone Practices → Basic → Use the default branch

Can improve code quality using technique: use the default branch

Always include a default branch in case statements.

Furthermore, use it for the intended default action and not just to execute the last option. If there is no default action, you can use the default branch to detect errors (i.e. if execution reached the default branch, raise a suitable error). This also applies to the final else of an if-else construct. That is, the final else should mean 'everything else', and not the final option. Do not use else when an if condition can be explicitly specified, unless there is absolutely no other possibility.

Bad

if (red) print "red";
else print "blue";

Good

if (red) print "red";
else if (blue) print "blue";
else error("incorrect input");

W6.2c

Implementation → Code Quality → Error-Prone Practices → Basic → Don't recycle variables or parameters

Can improve code quality using technique: don't recycle variables or parameters

  • Use one variable for one purpose. Do not reuse a variable for a different purpose other than its intended one, just because the data type is the same.
  • Do not reuse formal parameters as local variables inside the method.

Bad

double computeRectangleArea(double length, double width) {
    length = length * width;
    return length;
}
def compute_rectangle_area(length, width):
    length = length * width
    return length

Good

double computeRectangleArea(double length, double width) {
    double area;
    area = length * width;
    return area;
}
def compute_rectangle_area(length, width):
    area = length * width
    return area
}

W6.2d

Implementation → Code Quality → Error-Prone Practices → Basic → Avoid empty catch blocks

Can improve code quality using technique: avoid empty catch blocks

Never write an empty catch statement. At least give a comment to explain why the catch block is left empty.


W6.2e

Implementation → Code Quality → Error-Prone Practices → Basic → Delete dead code

Can improve code quality using technique: delete dead code

You might feel reluctant to delete code you have painstakingly written, even if you have no use for that code anymore ("I spent a lot of time writing that code; what if I need it again?"). Consider all code as baggage you have to carry; get rid of unused code the moment it becomes redundant. If you need that code again, simply recover it from the revision control tool you are using. Deleting code you wrote previously is a sign that you are improving.


W6.2f

Implementation → Code Quality → Error-Prone Practices → Intermediate → Minimize scope of variables

Can improve code quality using technique: minimize scope of variables

Minimize global variables. Global variables may be the most convenient way to pass information around, but they do create implicit links between code segments that use the global variable. Avoid them as much as possible.

Define variables in the least possible scope. For example, if the variable is used only within the if block of the conditional statement, it should be declared inside that if block.

The most powerful technique for minimizing the scope of a local variable is to declare it where it is first used. -- Effective Java, by Joshua Bloch

Resources:


W6.2g

Implementation → Code Quality → Error-Prone Practices → Intermediate → Minimize code duplication

Can improve code quality using technique: minimize code duplication

Code duplication, especially when you copy-paste-modify code, often indicates a poor quality implementation. While it may not be possible to have zero duplication, always think twice before duplicating code; most often there is a better alternative.

This guideline is closely related to the DRY Principle .


[W6.3] Developer Testing

W6.3a :

Quality Assurance → Testing → Developer Testing → What

Can explain developer testing

Developer testing is the testing done by the developers themselves as opposed to professional testers or end-users.


W6.3b :

Quality Assurance → Testing → Developer Testing → Why

Video

Can explain the need for early developer testing

Delaying testing until the full product is complete has a number of disadvantages:

  • Locating the cause of a test case failure is difficult due to a large search space; in a large system, the search space could be millions of lines of code, written by hundreds of developers! The failure may also be due to multiple inter-related bugs.
  • Fixing a bug found during such testing could result in major rework, especially if the bug originated from the design or during requirements specification i.e. a faulty design or faulty requirements.
  • One bug might 'hide' other bugs, which could emerge only after the first bug is fixed.
  • The delivery may have to be delayed if too many bugs are found during testing.

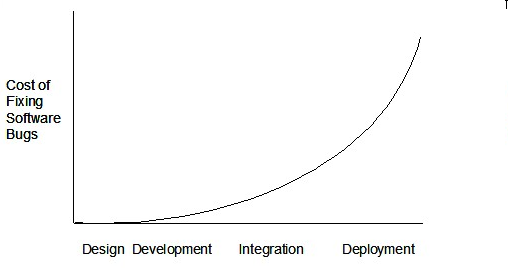
Therefore, it is better to do early testing, as hinted by the popular rule of thumb given below, also illustrated by the graph below it.

The earlier a bug is found, the easier and cheaper to have it fixed.

Such early testing of partially developed software is usually, and by necessity, done by the developers themselves i.e. developer testing.

Exercises


[W6.4] Unit Testing

Video

W6.4a :

Quality Assurance → Testing → Test Automation → Test automation using test drivers

Can explain test drivers

A test driver is the code that ‘drives’ the Software Under TestSUT for the purpose of testing i.e. invoking the SUT with test inputs and verifying if the behavior is as expected.

PayrollTest ‘drives’ the Payroll class by sending it test inputs and verifies if the output is as expected.

public class PayrollTest {
    public static void main(String[] args) throws Exception {

        // test setup
        Payroll p = new Payroll();

        // test case 1
        p.setEmployees(new String[]{"E001", "E002"});
        // automatically verify the response
        if (p.totalSalary() != 6400) {
            throw new Error("case 1 failed ");
        }

        // test case 2
        p.setEmployees(new String[]{"E001"});
        if (p.totalSalary() != 2300) {
            throw new Error("case 2 failed ");
        }

        // more tests...

        System.out.println("All tests passed");
    }
}

W6.4b :

Quality Assurance → Testing → Test Automation → Test automation tools

Can explain test automation tools

JUnit is a tool for automated testing of Java programs. Similar tools are available for other languages and for automating different types of testing.

This is an automated test for a Payroll class, written using JUnit libraries.

@Test
public void testTotalSalary() {
    Payroll p = new Payroll();

    // test case 1
    p.setEmployees(new String[]{"E001", "E002"});
    assertEquals(6400, p.totalSalary());

    // test case 2
    p.setEmployees(new String[]{"E001"});
    assertEquals(2300, p.totalSalary());

    // more tests...
}

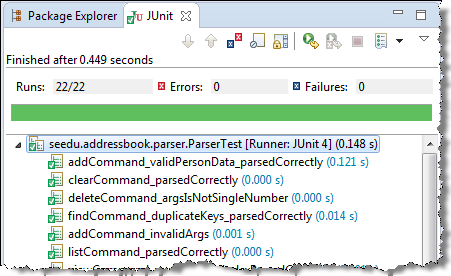
Most modern IDEs have integrated support for testing tools. The figure below shows the JUnit output when running some JUnit tests using the Eclipse IDE.


W6.4c :

Quality Assurance → Testing → Unit Testing → What

Can explain unit testing

Unit testing: testing individual units (methods, classes, subsystems, ...) to ensure each piece works correctly.

In OOP code, it is common to write one or more unit tests for each public method of a class.

Here are the code skeletons for a Foo class containing two methods and a FooTest class that contains unit tests for those two methods.

class Foo {
    String read() {
        // ...
    }
    
    void write(String input) {
        // ...
    }
    
}
class FooTest {
    
    @Test
    void read() {
        // a unit test for Foo#read() method
    }
    
    @Test
    void write_emptyInput_exceptionThrown() {
        // a unit tests for Foo#write(String) method
    }  
    
    @Test
    void write_normalInput_writtenCorrectly() {
        // another unit tests for Foo#write(String) method
    }
}
import unittest

class Foo:
  def read(self):
      # ...
  
  def write(self, input):
      # ...


class FooTest(unittest.TestCase):
  
  def test_read(self):
      # a unit test for read() method
  
  def test_write_emptyIntput_ignored(self):
      # a unit test for write(string) method
  
  def test_write_normalInput_writtenCorrectly(self):
      # another unit test for write(string) method

Resources


W6.4d :

C++ to Java → JUnit → JUnit: Basic

Can use simple JUnit tests

When writing JUnit tests for a class Foo, the common practice is to create a FooTest class, which will contain various test methods.

Suppose we want to write tests for the IntPair class below.

public class IntPair {
    int first;
    int second;

    public IntPair(int first, int second) {
        this.first = first;
        this.second = second;
    }

    public int intDivision() throws Exception {
        if (second == 0){
            throw new Exception("Divisor is zero");
        }
        return first/second;
    }

    @Override
    public String toString() {
        return first + "," + second;
    }
}

Here's a IntPairTest class to match (using JUnit 5).

import org.junit.jupiter.api.Test;

import static org.junit.jupiter.api.Assertions.assertEquals;
import static org.junit.jupiter.api.Assertions.fail;

public class IntPairTest {


    @Test
    public void testStringConversion() {
        assertEquals("4,7", new IntPair(4, 7).toString());
    }

    @Test
    public void intDivision_nonZeroDivisor_success() throws Exception {
        assertEquals(2, new IntPair(4, 2).intDivision());
        assertEquals(0, new IntPair(1, 2).intDivision());
        assertEquals(0, new IntPair(0, 5).intDivision());
    }

    @Test
    public void intDivision_zeroDivisor_exceptionThrown() {
        try {
            assertEquals(0, new IntPair(1, 0).intDivision());
            fail(); // the test should not reach this line
        } catch (Exception e) {
            assertEquals("Divisor is zero", e.getMessage());
        }
    }
}

Notes:

  • Each test method is marked with a @Test annotation.
  • Tests use Assert.assertEquals(expected, actual) methods to compare the expected output with the actual output. If they do not match, the test will fail. JUnit comes with other similar methods such as Assert.assertNull and Assert.assertTrue.
  • Java code normally use camelCase for method names e.g., testStringConversion but when writing test methods, sometimes another convention is used: whatIsBeingTested_descriptionOfTestInputs_expectedOutcome e.g., intDivision_zeroDivisor_exceptionThrown
  • There are several ways to verify the code throws the correct exception. The third test method in the example above shows one of the simpler methods. If the exception is thrown, it will be caught and further verified inside the catch block. But if it is not thrown as expected, the test will reach Assert.fail() line and will fail as a result.
  • The easiest way to run JUnit tests is to do it via the IDE. For example, in Intellij you can right-click the folder containing test classes and choose 'Run all tests...'

Adding JUnit 5 to your IntelliJ Project -- by Kevintroko@YouTube

Resources